Users
The Users Tab under User Management provides a comprehensive overview of all users, including Workspace Owners, Workspace Members and App Users. From this central hub, you can perform all user-related actions on an individual basis, ensuring efficient management and control of user accounts within your workspace.
-
Workspace Owner: Complete authority of the portal with full control over settings, user management, and permissions.
-
Workspace Member: A trusted collaborator, invited as a PORTAL Administrator, with defined access to help manage operations smoothly.
-
App User: End-users who register and interact with the platform through the SuperApp, enjoying seamless access to features and services powered by KOBIL.

I. App User
List App Users
All users are listed under the Users tab. You can filter users based on their Role, with three distinct roles available: Workspace Owner, Workspace Member, and App User. This filter allows for more targeted management of user accounts.
Workspace Owners and Members are empowered to efficiently manage and resolve App User issues by performing a range of actions, including restricting access to user accounts when necessary. Additionally, they can block and unblock App Users to maintain security and compliance, ensuring a seamless and secure user experience.

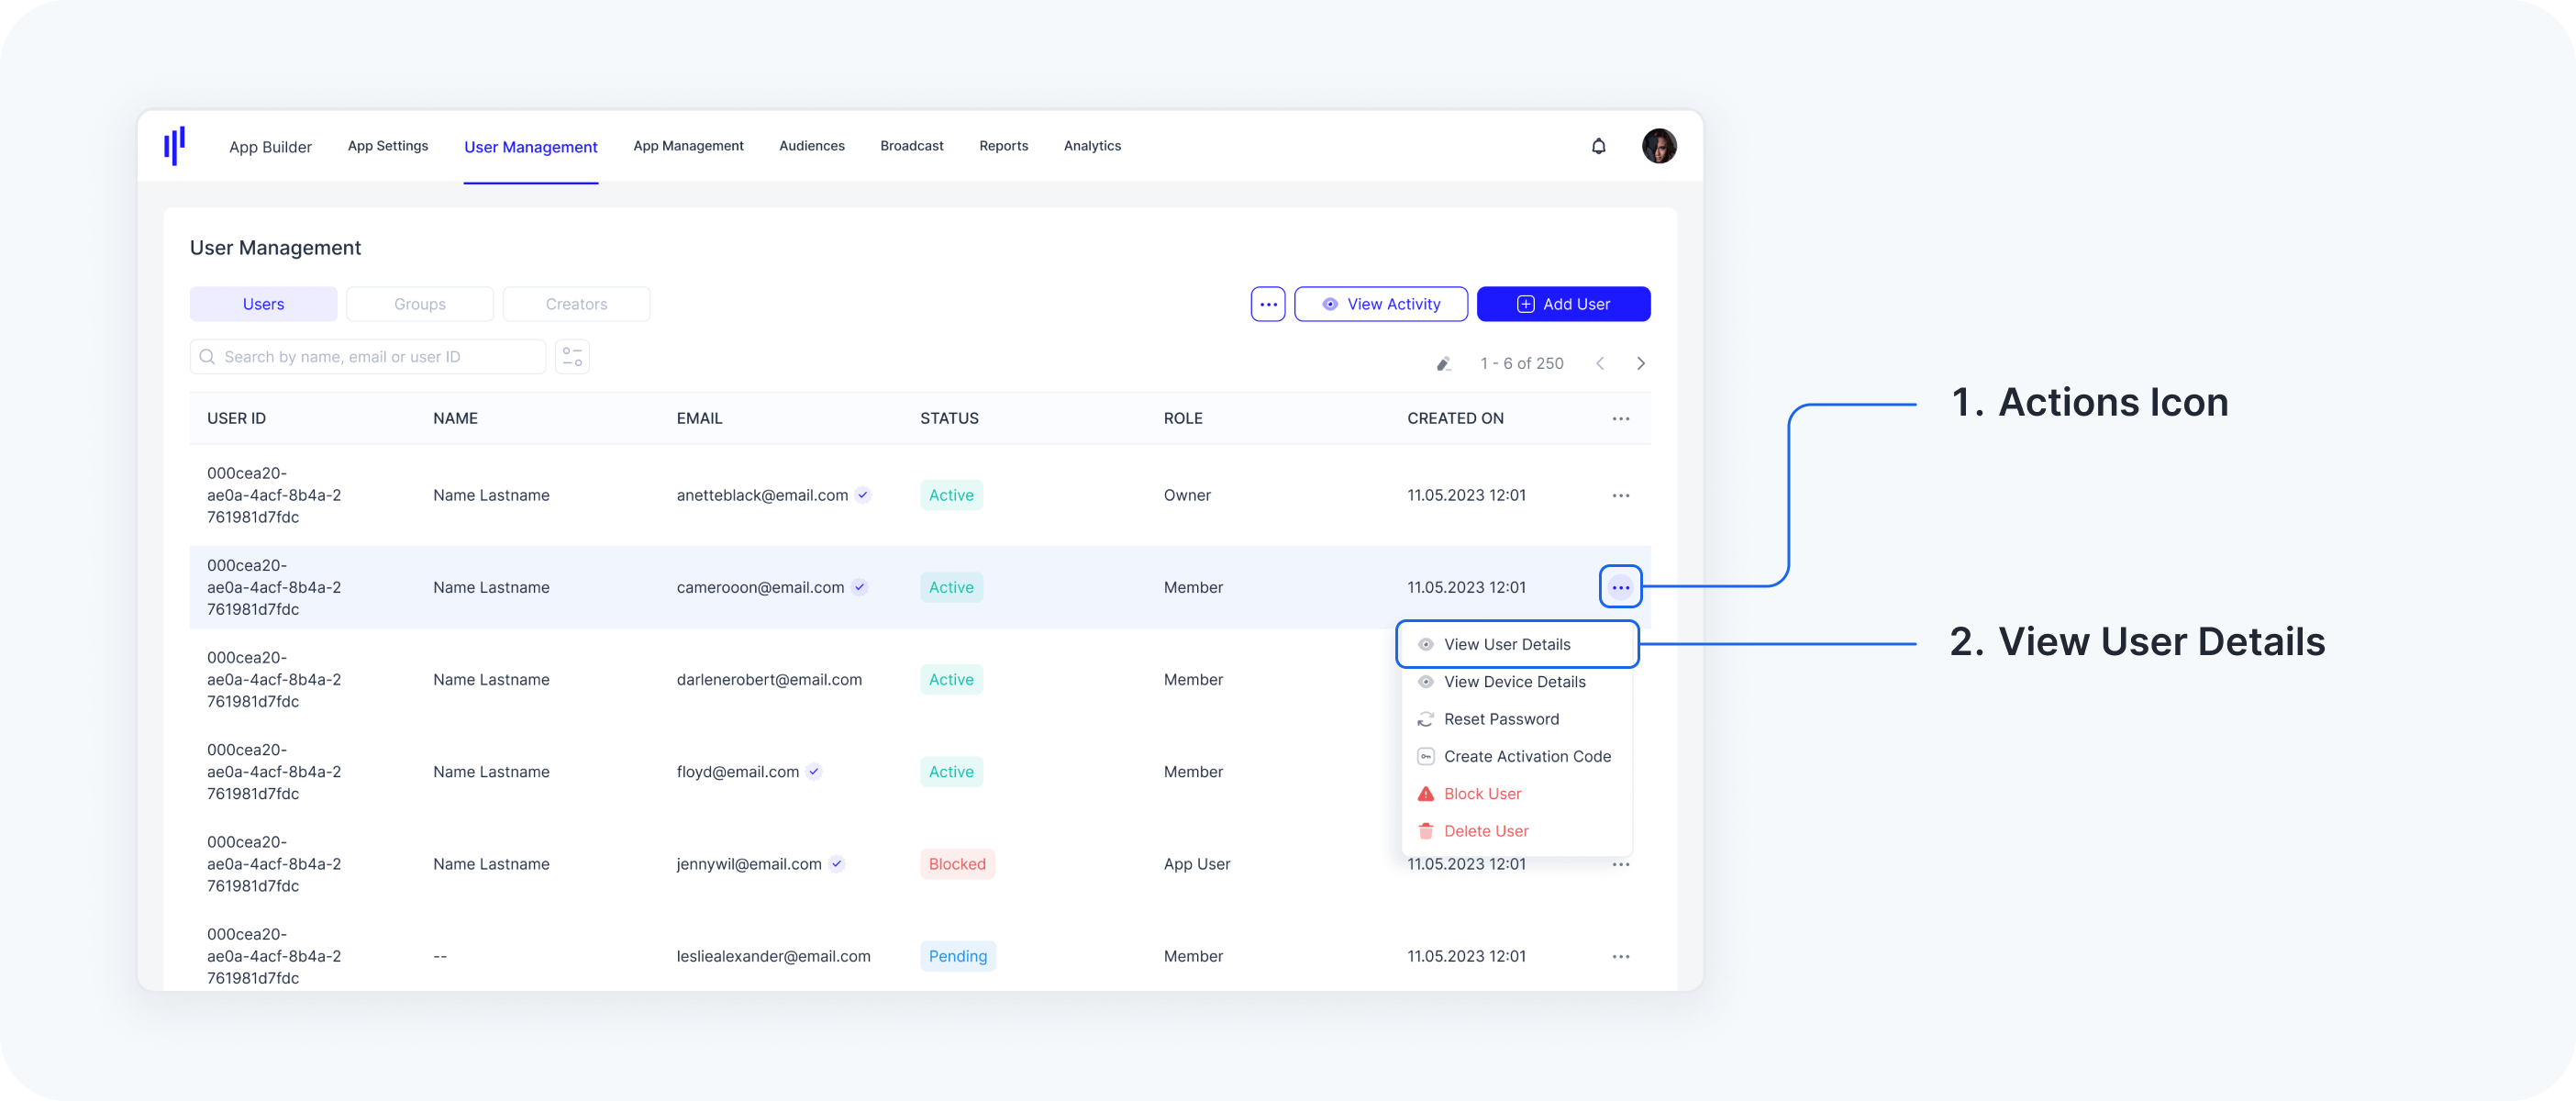
View User Details
The "View User Details" section provides a detailed overview of each user, organized into six key tabs: Digital ID, Attributes, Login Details, Activity, Groups, and Roles. These tabs allow administrators to manage user identities, review group assignments, adjust roles, and track user activity.
-
Digital ID: Displays all relevant information about the user's KOBIL Digital Identity, offering a comprehensive view of their identity credentials within the system.
-
Attributes: Shows detailed metadata about the user, including key-value pairs related to their login activity, identity verification, and system interactions. This includes timestamps for successful and failed login attempts, consent approval, account linking, and verification status, giving administrators precise insights into the user’s engagement and security status.
-
Login Details: Provides critical information on a user’s recent login activity, including the timestamps for their last successful and failed attempts, the number of failed attempts, and any restrictions on future login attempts. This data helps Workspace Users monitor access patterns and efficiently troubleshoot login issues.
-
Activity: Tracks user activity within the platform, offering insights into how users are interacting with the system.
-
Groups: Lists all groups the user is currently assigned to. Administrators can manage user group memberships directly from this section, adding or removing users from groups to ensure appropriate access privileges.
-
Roles: Workspace Users can assign specific roles and permissions within the workspace. Roles like Workspace Owner and Workspace Member provide varying levels of access and control, from full administrative rights to limited viewing permissions. Additional custom roles can be created to tailor access to specific features such as App Builder, User Management, or App Management, ensuring that access aligns with organizational needs.
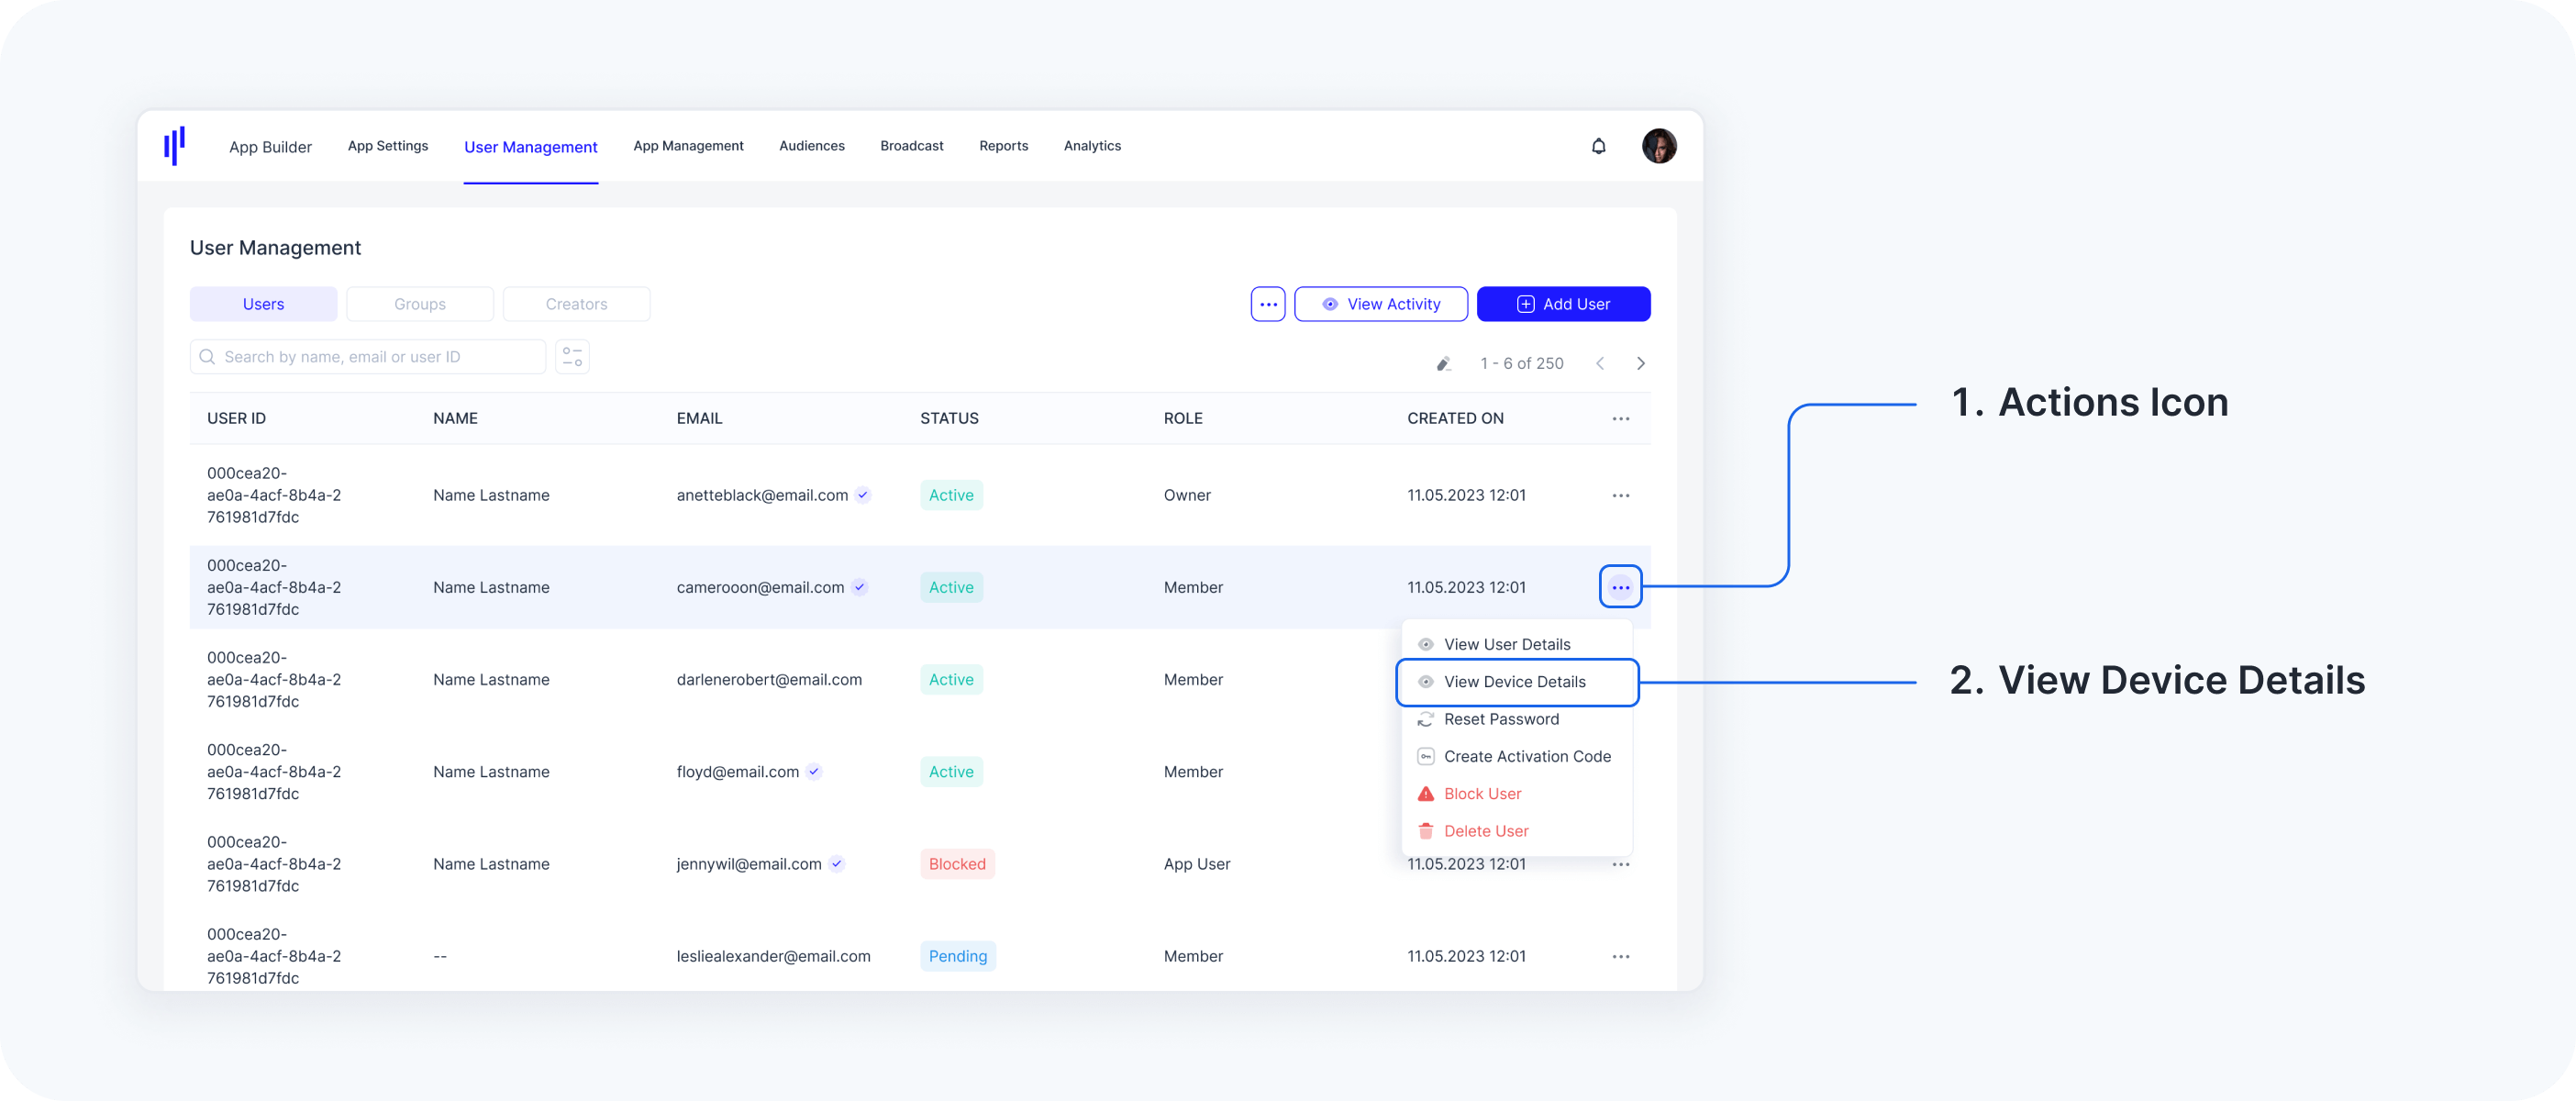
View Device Details
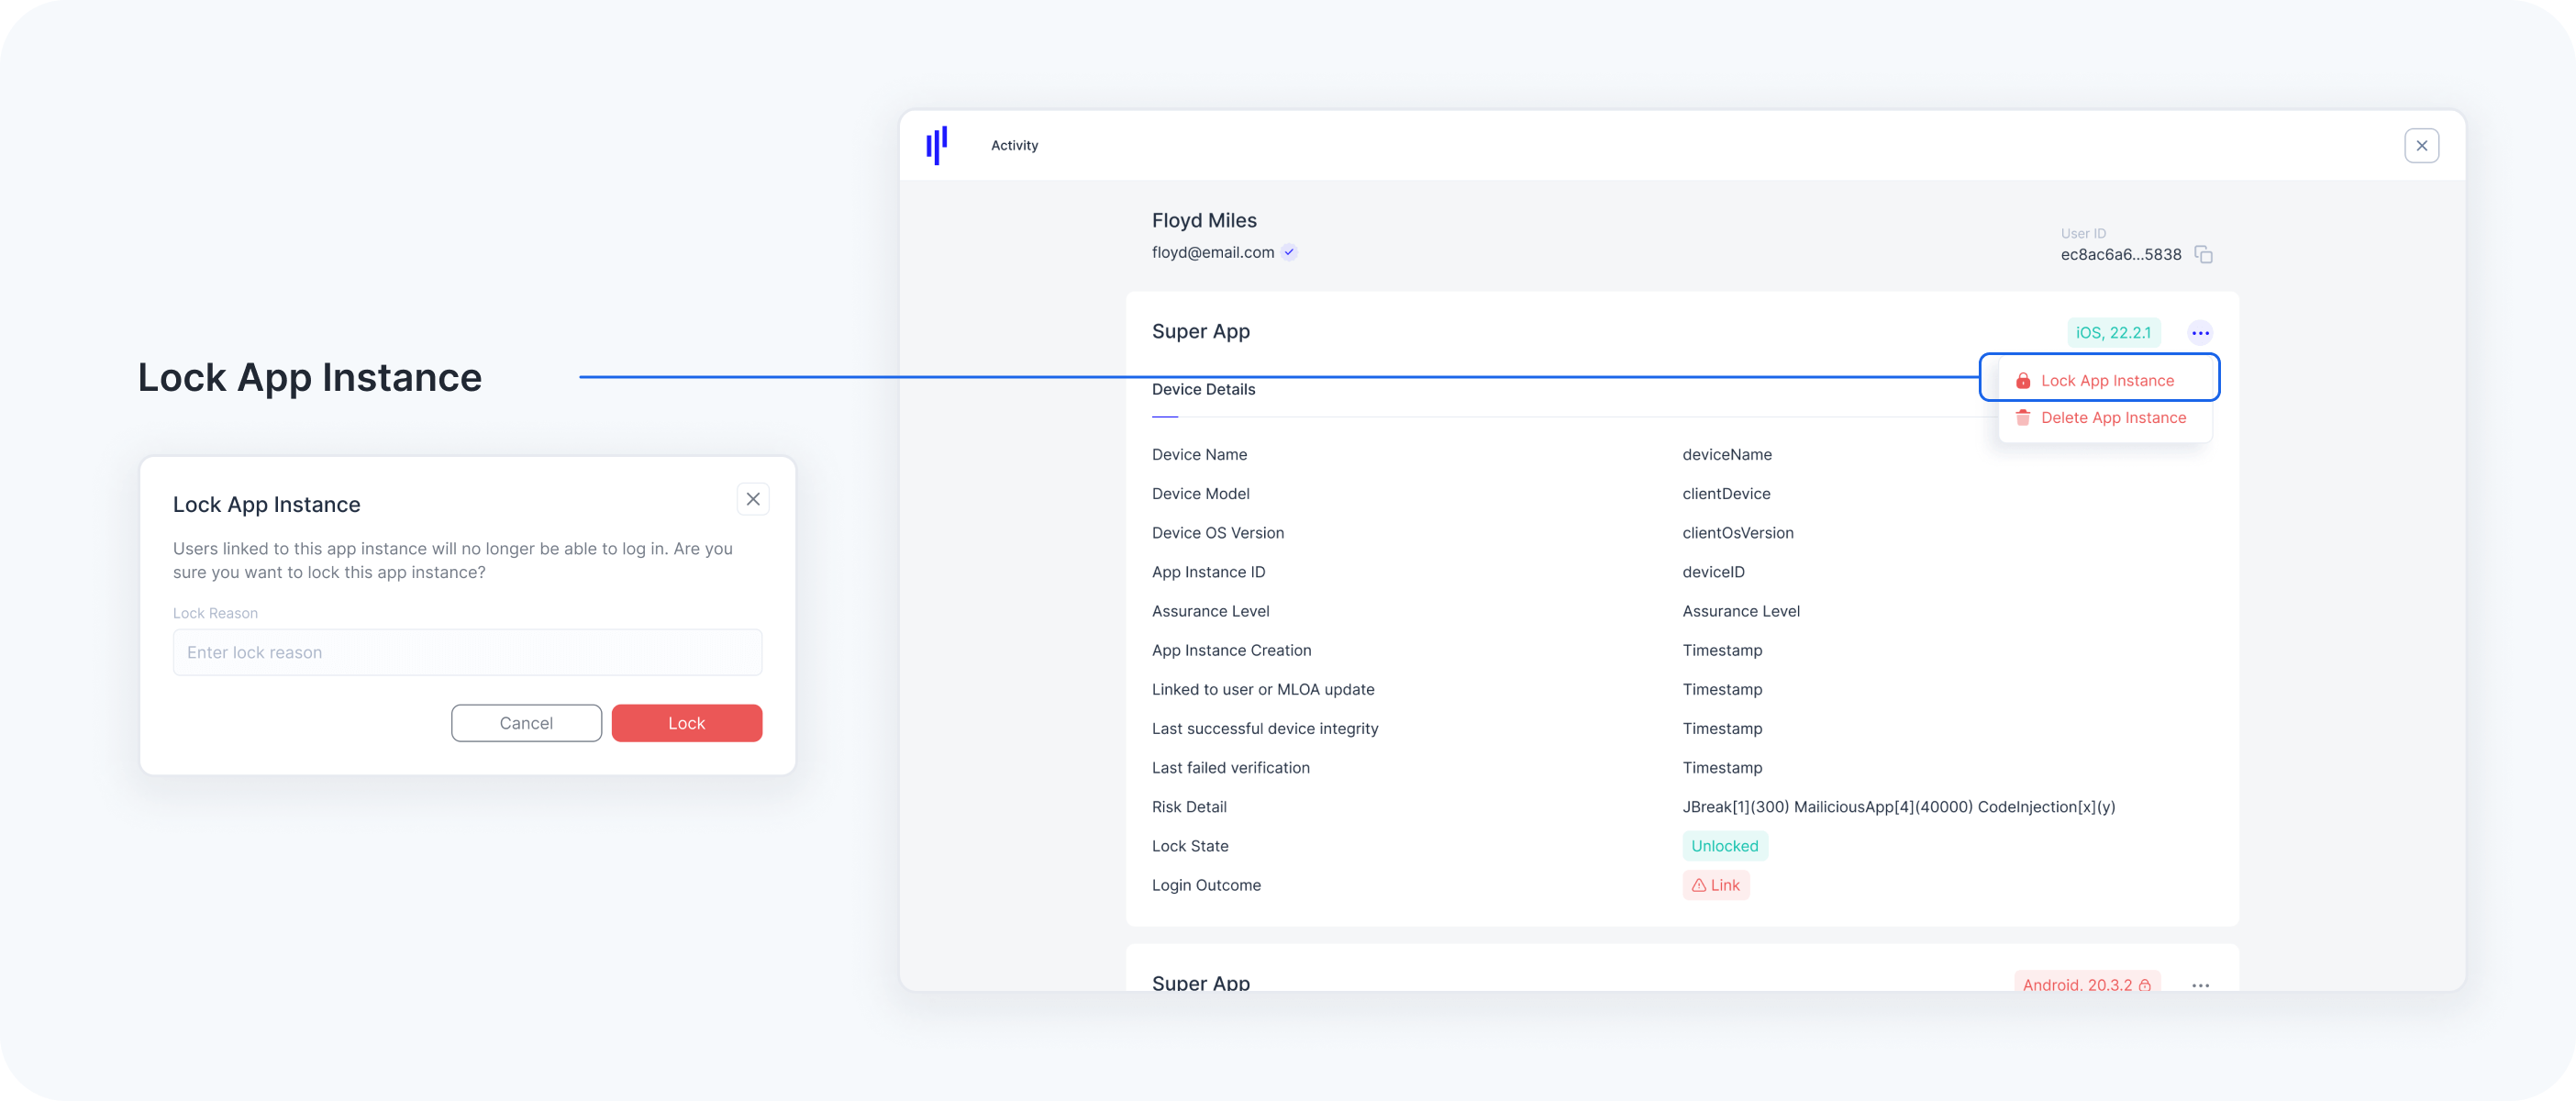
The "Device Details" tab provides a comprehensive overview of a user's device and its interaction with the application. It displays critical information such as the device name, model, operating system version, app instance ID, and assurance level, offering insights into the device's security and integrity status. Additional details include the app instance creation date, lock state, login outcome, and the latest device verification status. This tab is designed to help administrators monitor device compliance, assess risk, and troubleshoot device-specific issues within the platform.
Workspace User can also block a certain Application on a specific Device from this page. ‘Lock App Instance’ will disable the User’s access to the Application for a specific device. ‘Delete App Instance’ will undo Device-binding, the user can perform Activation again on the device.
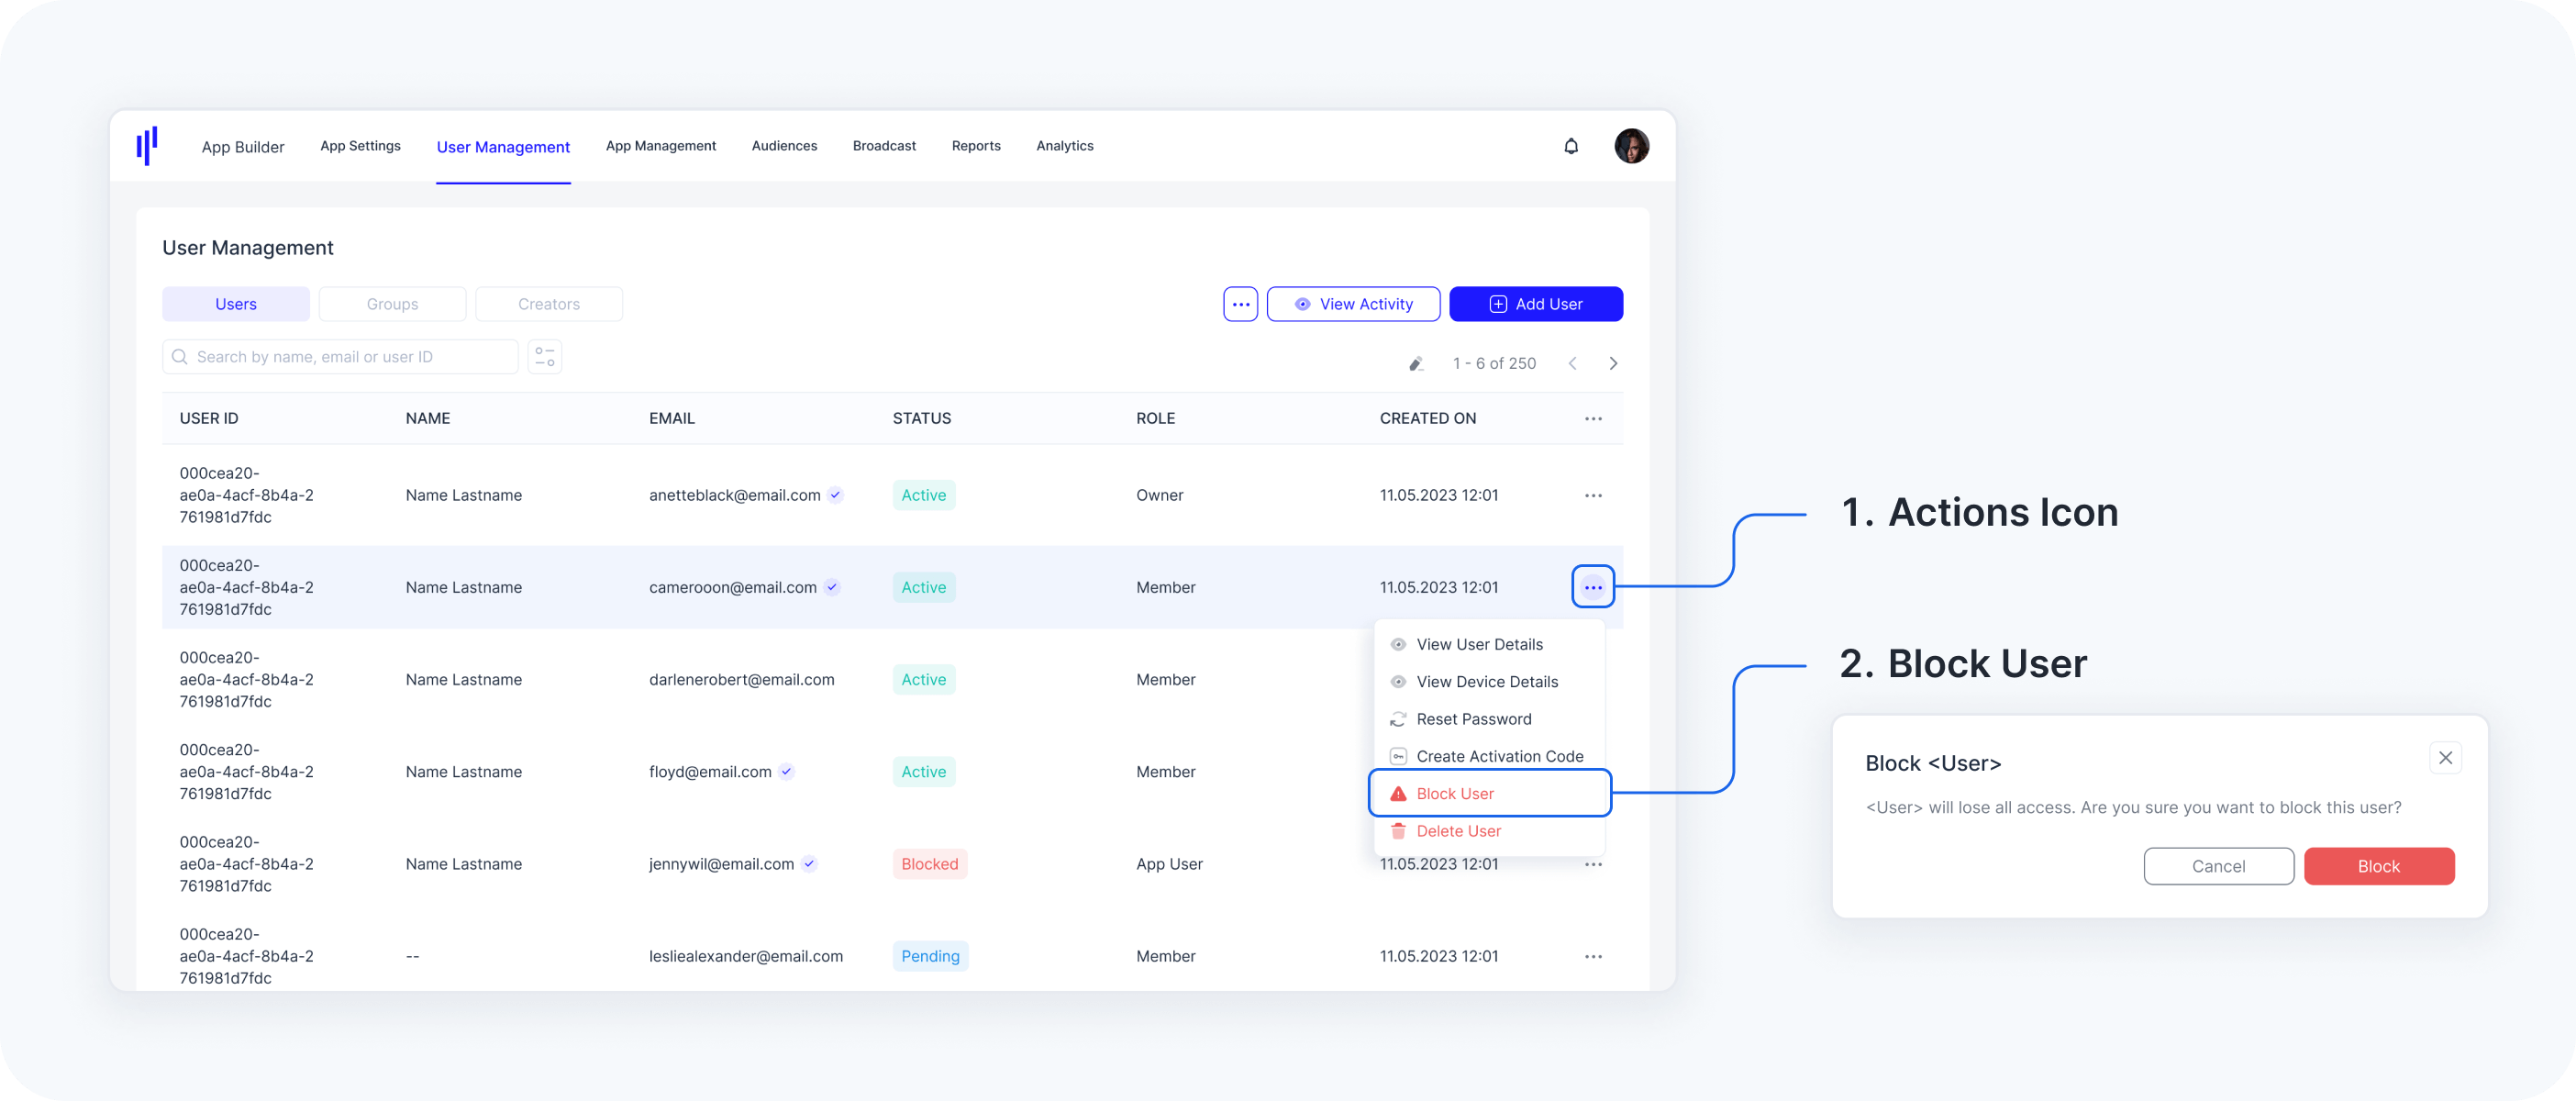
Block/Unblock Users
For security reasons, Workspace Users have the ability to block a user, preventing them from logging into either their app or the KOBIL PORTAL. Only users with an Active status can be blocked or unblocked. Once blocked, the user is unable to log into their account from any device, ensuring enhanced security and preventing unauthorized access.
Steps to Block a User:
- Navigate to User Management.
- Go to the Users tab.
- Search for and click on the desired user.
- Select Block User from the dropdown menu.
- Approve the confirmation pop-up.
The user is now blocked, and their status will change to Blocked.
Steps to Unblock a User
- Navigate to User Management.
- Go to the Users tab.
- Search for and click on the Blocked user.
- Select Unblock User from the dropdown menu.
- Approve the confirmation pop-up.
The user is now unblocked, and their status will change to Active.
Lock/Unlock a Specific User Device
Workspace Users can lock a specific device for a user if access needs to be revoked on that device. The user will still be able to access their app on other devices.
Steps to Lock a Specific User Device:
- Navigate to User Management.
- Go to the Users tab.
- Search for and click on the user.
- Select Device Details from the dropdown menu.
In the Device Details section, scroll to find the correct Device Model and App Version.
- Click on the three-dotted additional menu.
- Select Lock App Instance.
The user will no longer be able to log in from this specific device.
Steps to Unlock a Specific User Device:
- Navigate to User Management.
- Go to the Users tab.
- Search for and click on the user.
- Select Device Details from the dropdown menu.
In the Device Details section, scroll to find the correct Device Model and App Version.
- Click on the three-dotted additional menu.
- Select Unlock App Instance.
The user will now be able to log in from this device.
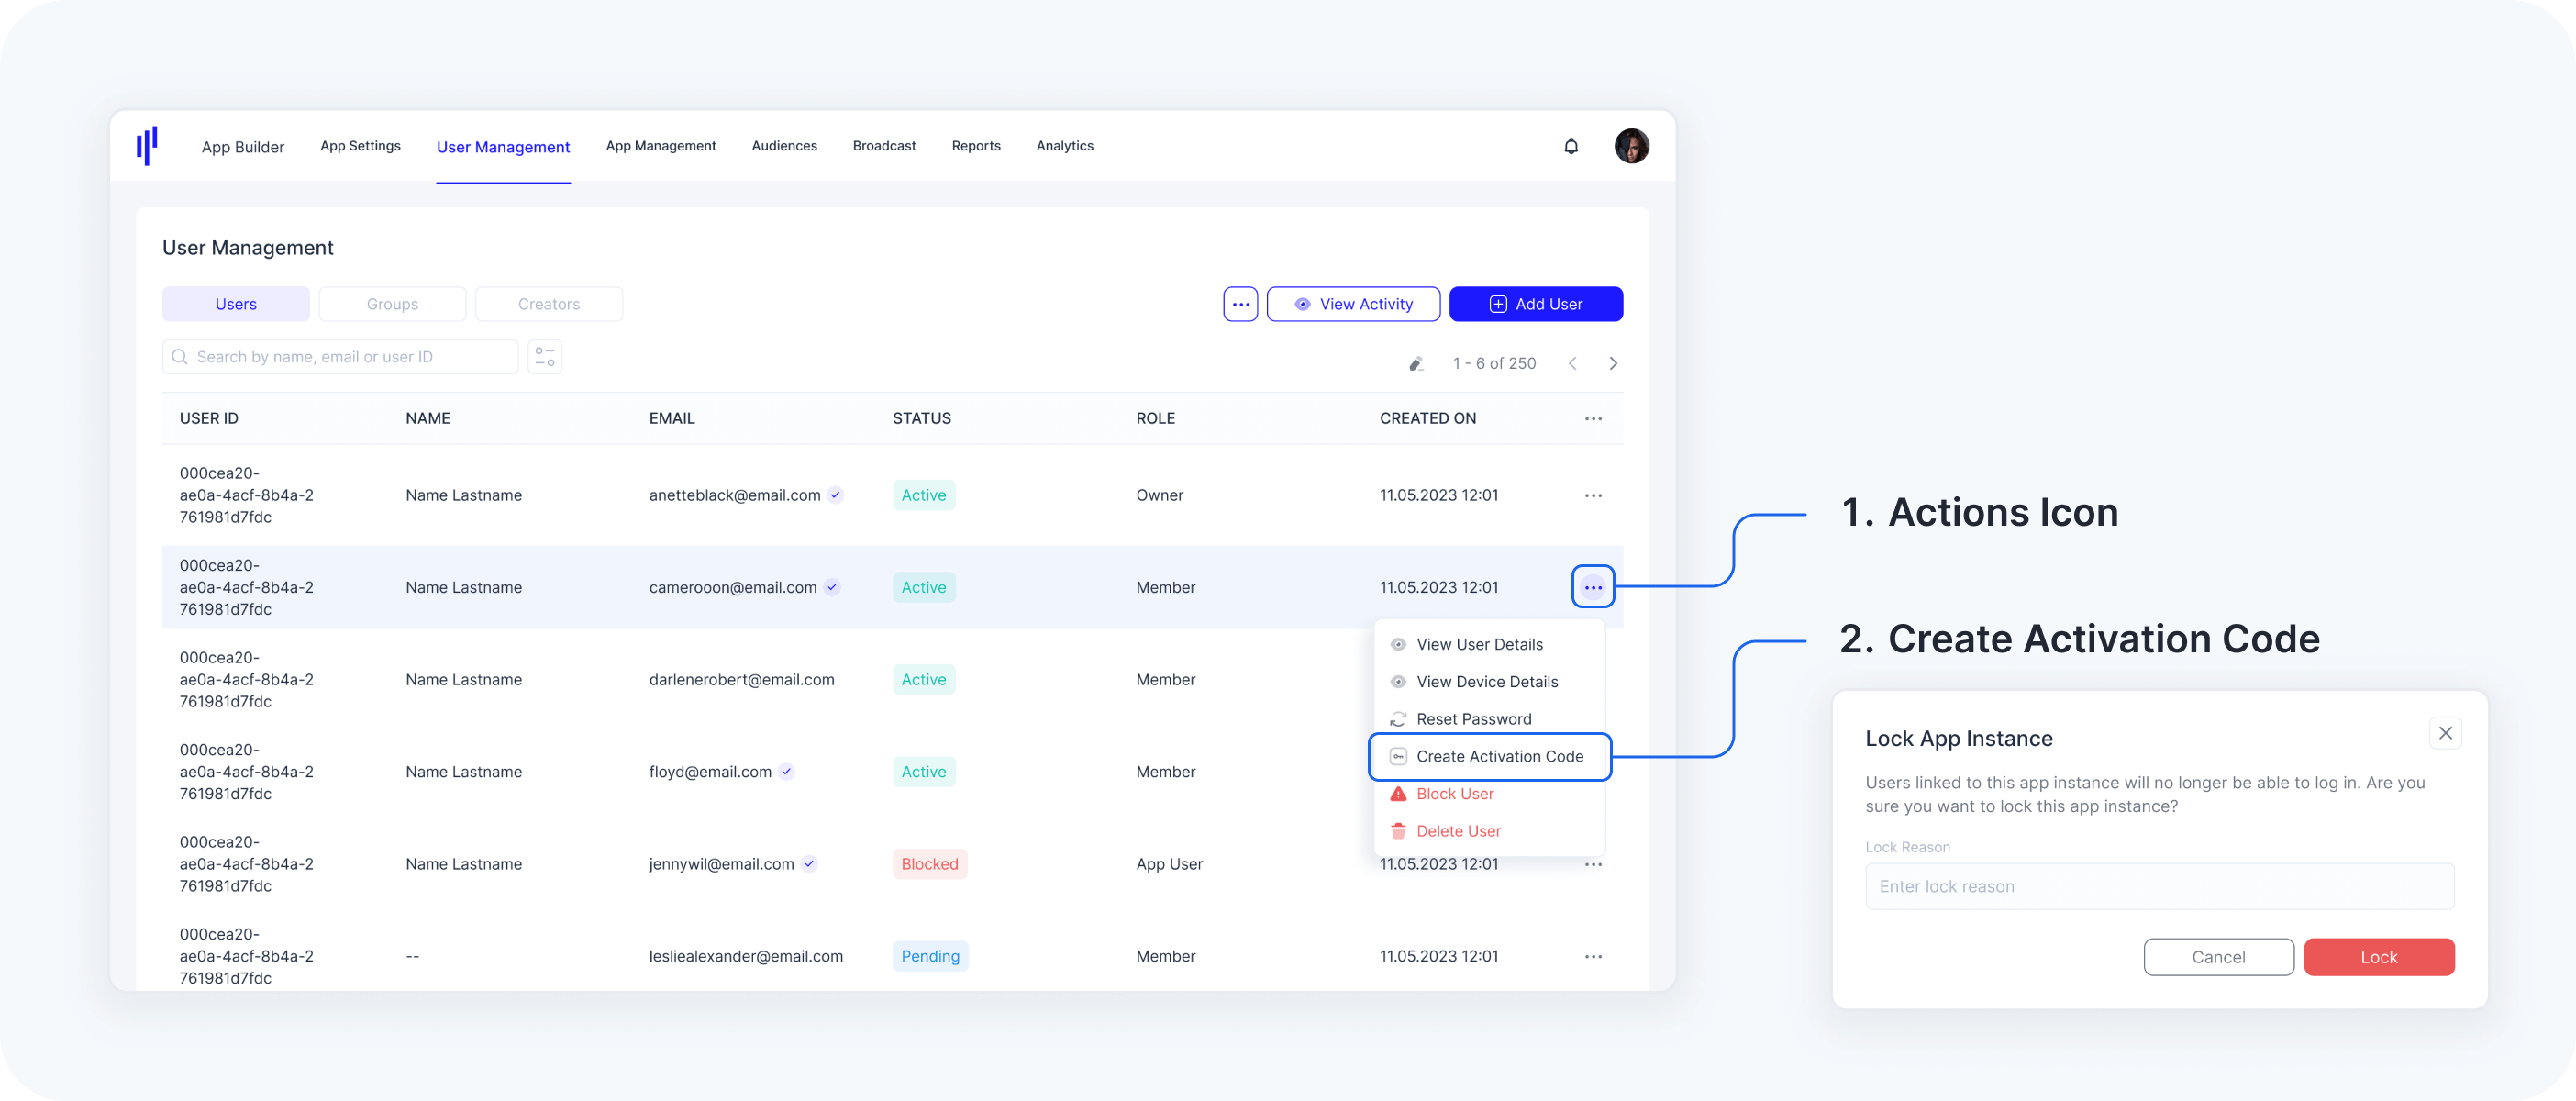
Create Activation Code for a User
For help Troubleshooting activation related issues, Workspace Users can directly create Activation Codes to assist App Users.
Steps to Create an Activation Code:
- Navigate to User Management.
- Select the Users tab.
Search for the specific App User using their email, name, surname, or user ID.
Click on the user and select Create Activation Code from the dropdown menu.
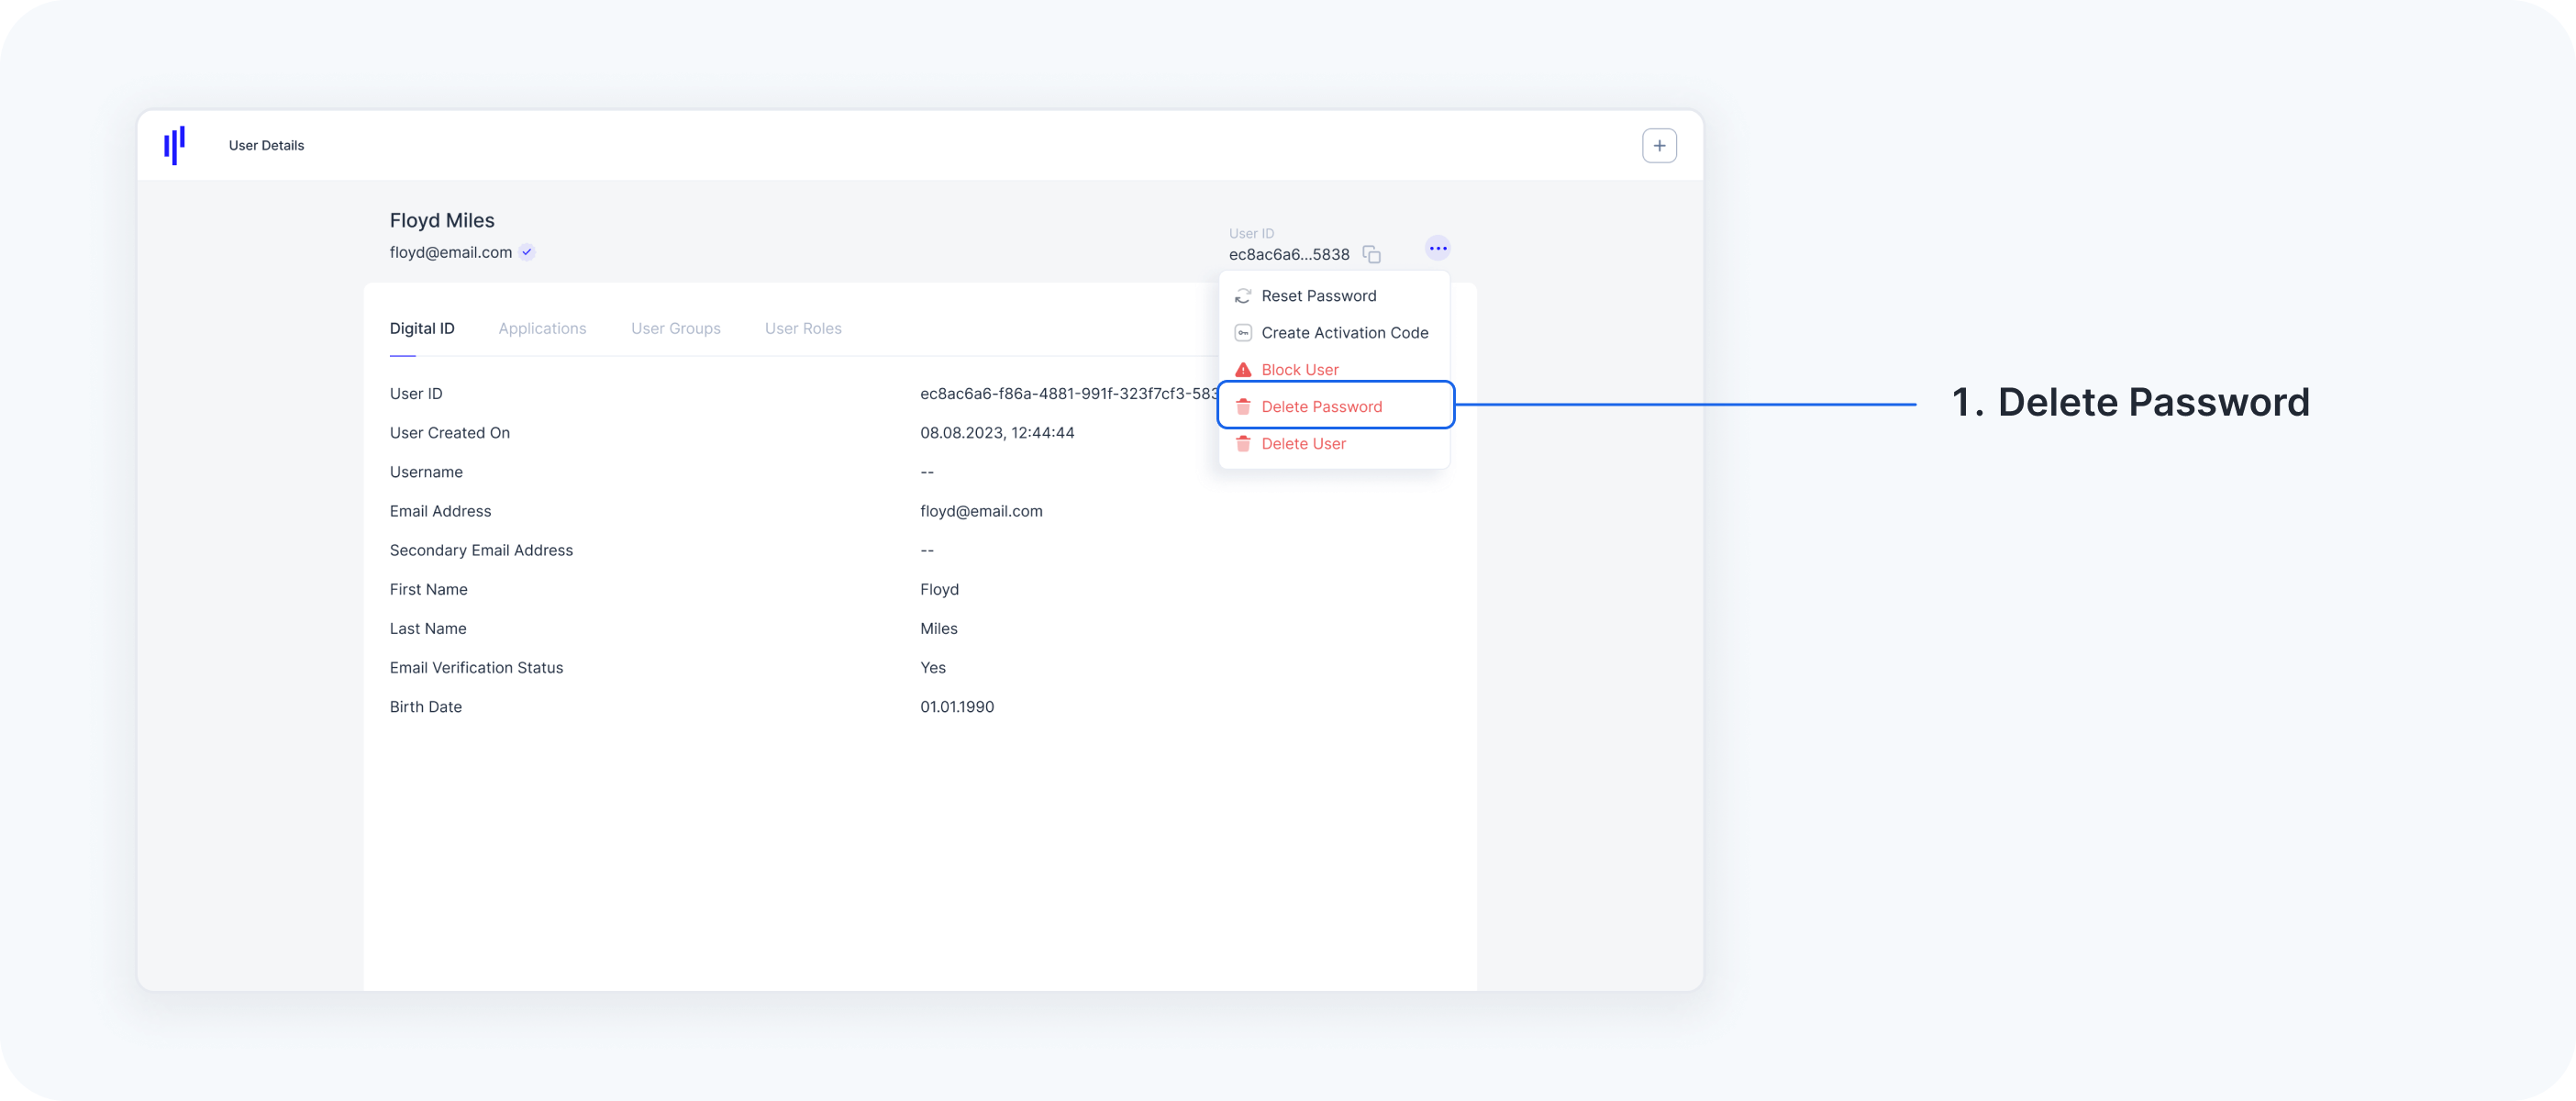
Delete Password for a User
The Delete Password feature allows Workspace Users to remove the current password associated with a specific user account. This action is typically used in scenarios that require enhanced security, such as forcing a password reset.
-
Immediate Deletion: The user's password is immediately removed, preventing access until a new password is set.
-
Secure Process: The deletion is recorded in system activity logs for auditing and tracking purposes.
-
Access Recovery: After deletion, users are prompted to set a new password during their next login attempt.
Steps to Delete a User's Password:
- Navigate to User Management.
- Select the Users tab.
- Search for and click on the user.
Search for the specific user using attributes such as name, surname, or user ID.
- Click on the User and Select User Details from the dropdown menu.
- Click on three-dotted button to see more actions.
- Select Delete Password from the dropdown menu.
- Approve the confirmation pop-up.
The user's password has now been deleted.
II. Workspace User (Owner & Member)
Workspace Owners are super admins with full access to all functionalities, including the ability to invite additional Workspace Owners, giving them complete control over user management, settings, and permissions. In contrast, Workspace Members have access to only specific functionalities, making their role ideal for delegating responsibilities and tasks without granting full administrative control. Both roles can be adjusted as needed, allowing you to change user roles or delete unnecessary users to maintain a streamlined and efficient workspace.
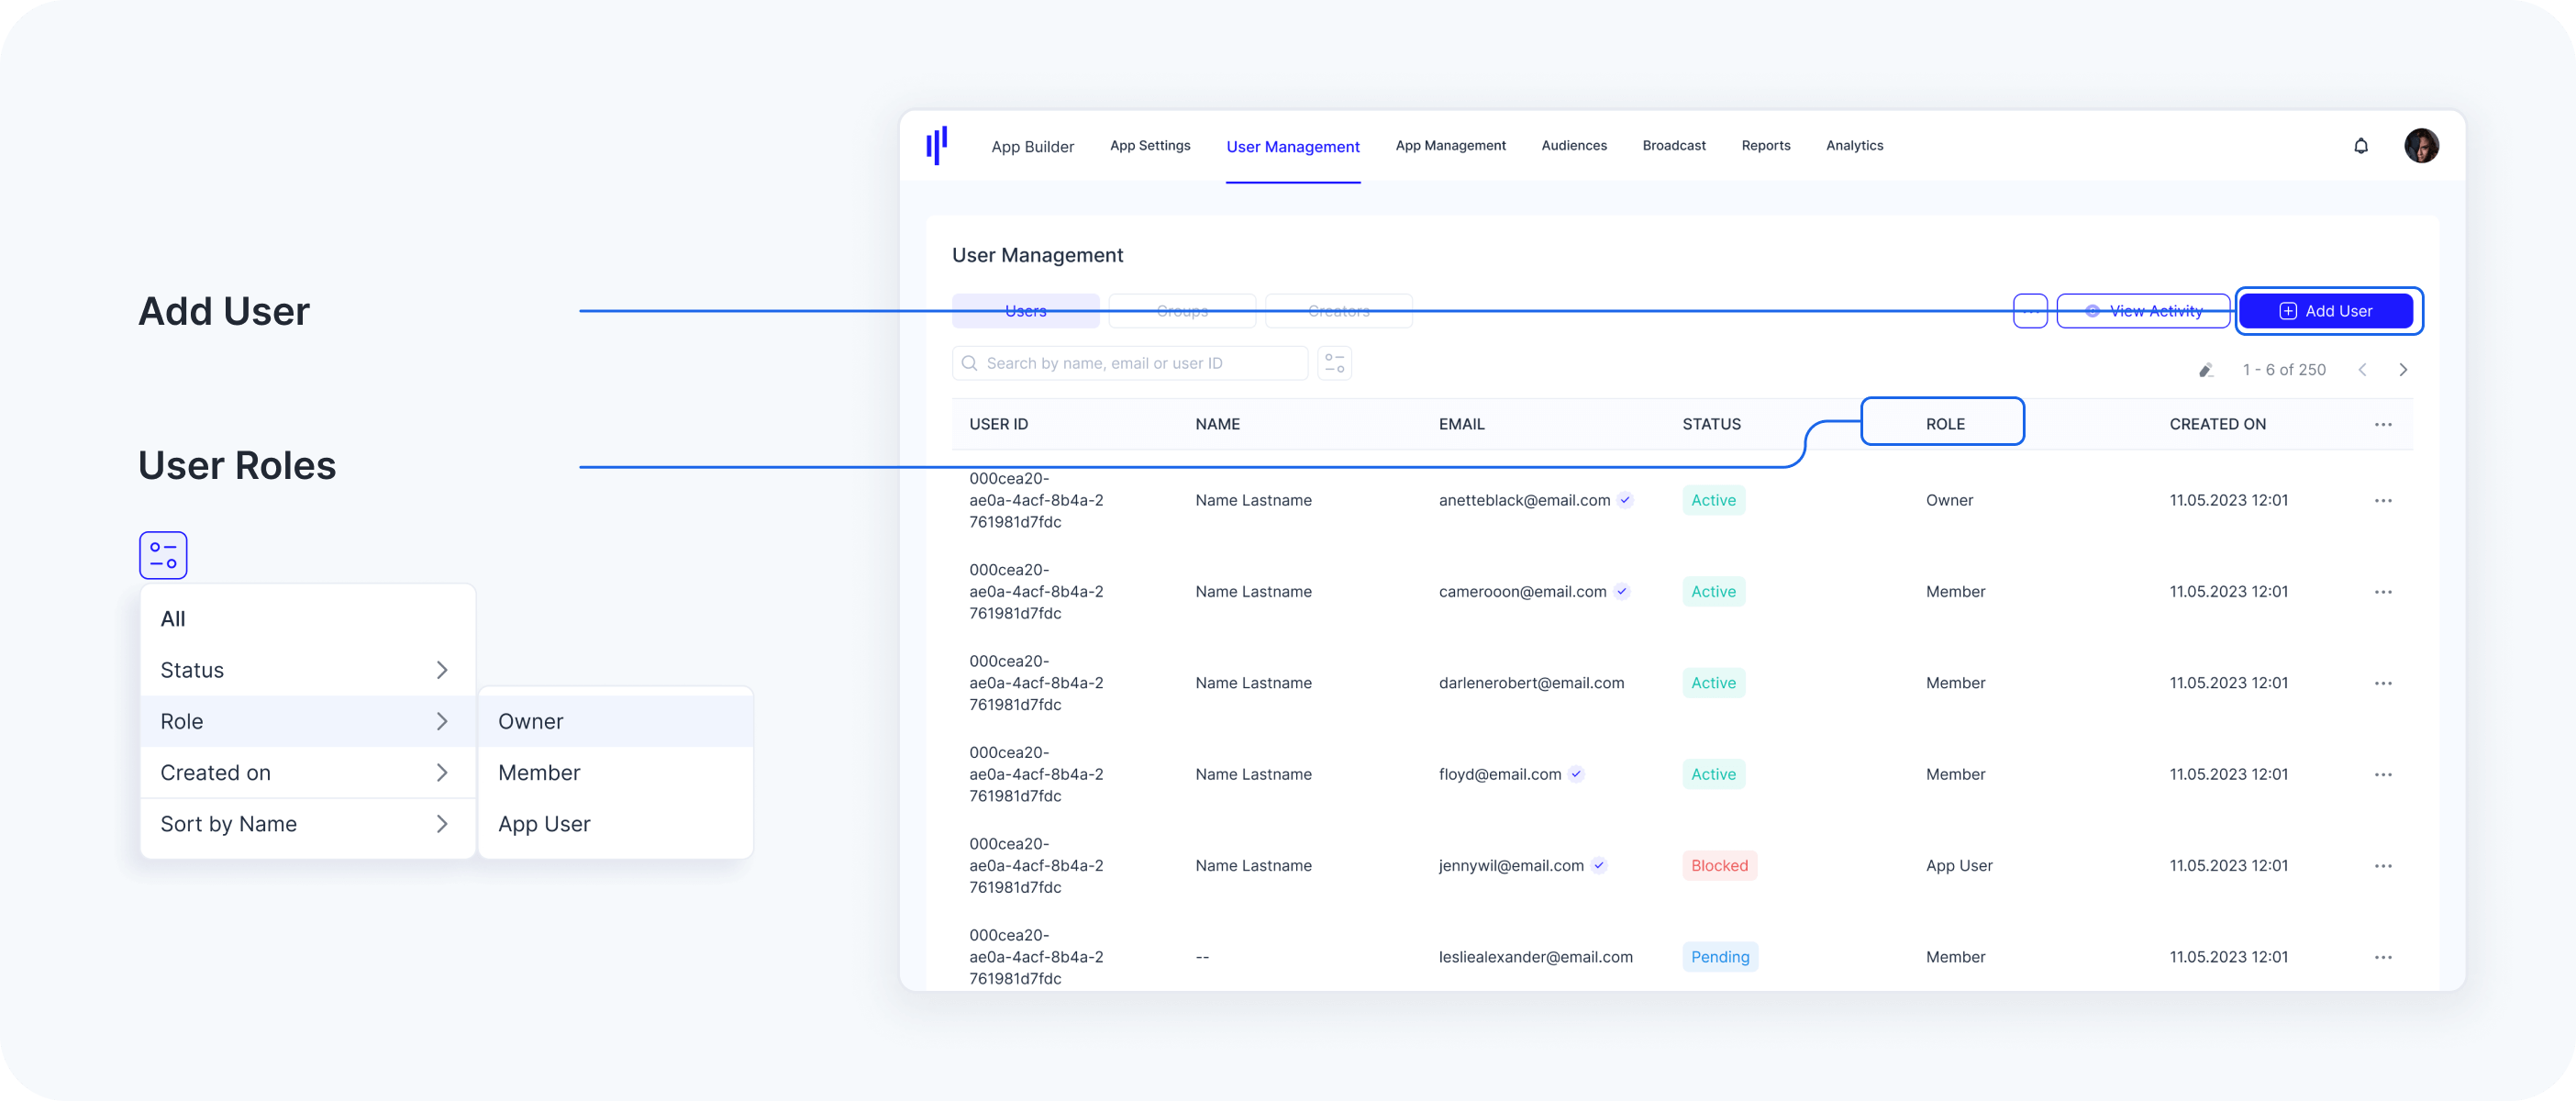
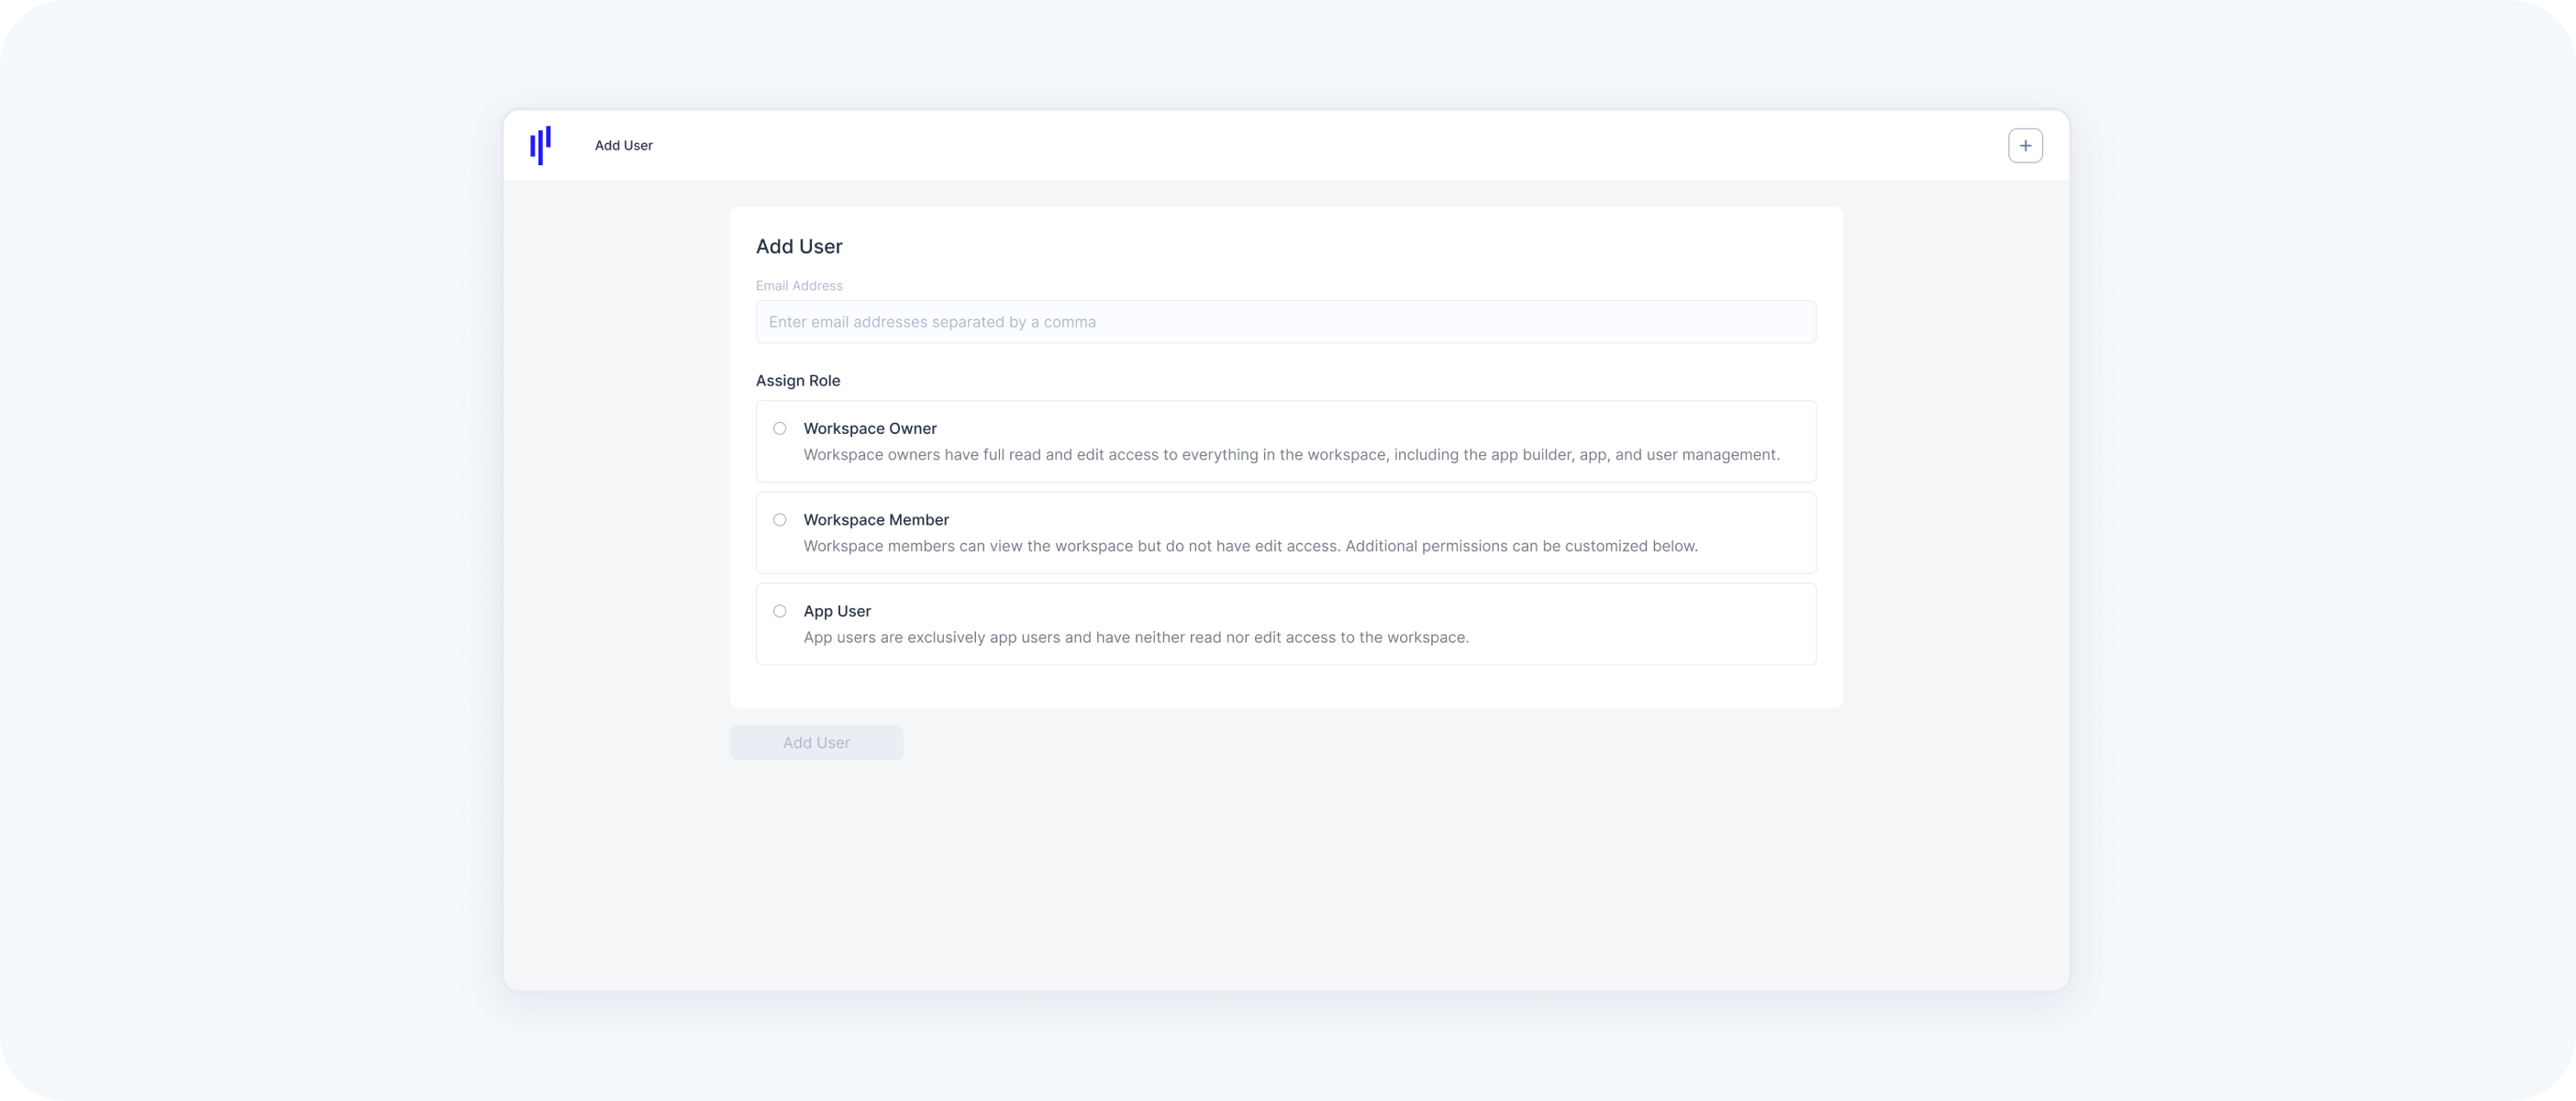
Invite a Workspace User
Steps to invite a Workspace User:
- Navigate to User Management and click on the Add Users button.
- Enter the user’s email address.
- Select the user’s role:
Workspace Owner: A Workspace Owner is a Super Admin with full access to all users and all PORTAL functionalities. They can also invite additional Workspace Owners or Members, and even delete existing Workspace Owners.
- Workspace Member: This role grants access only to selected features and functionalities, making it useful for delegating tasks without full administrative control. Learn more about Workspace Roles here.
Note: Multiple users can be invited at once by entering additional email addresses in the Email Address field.
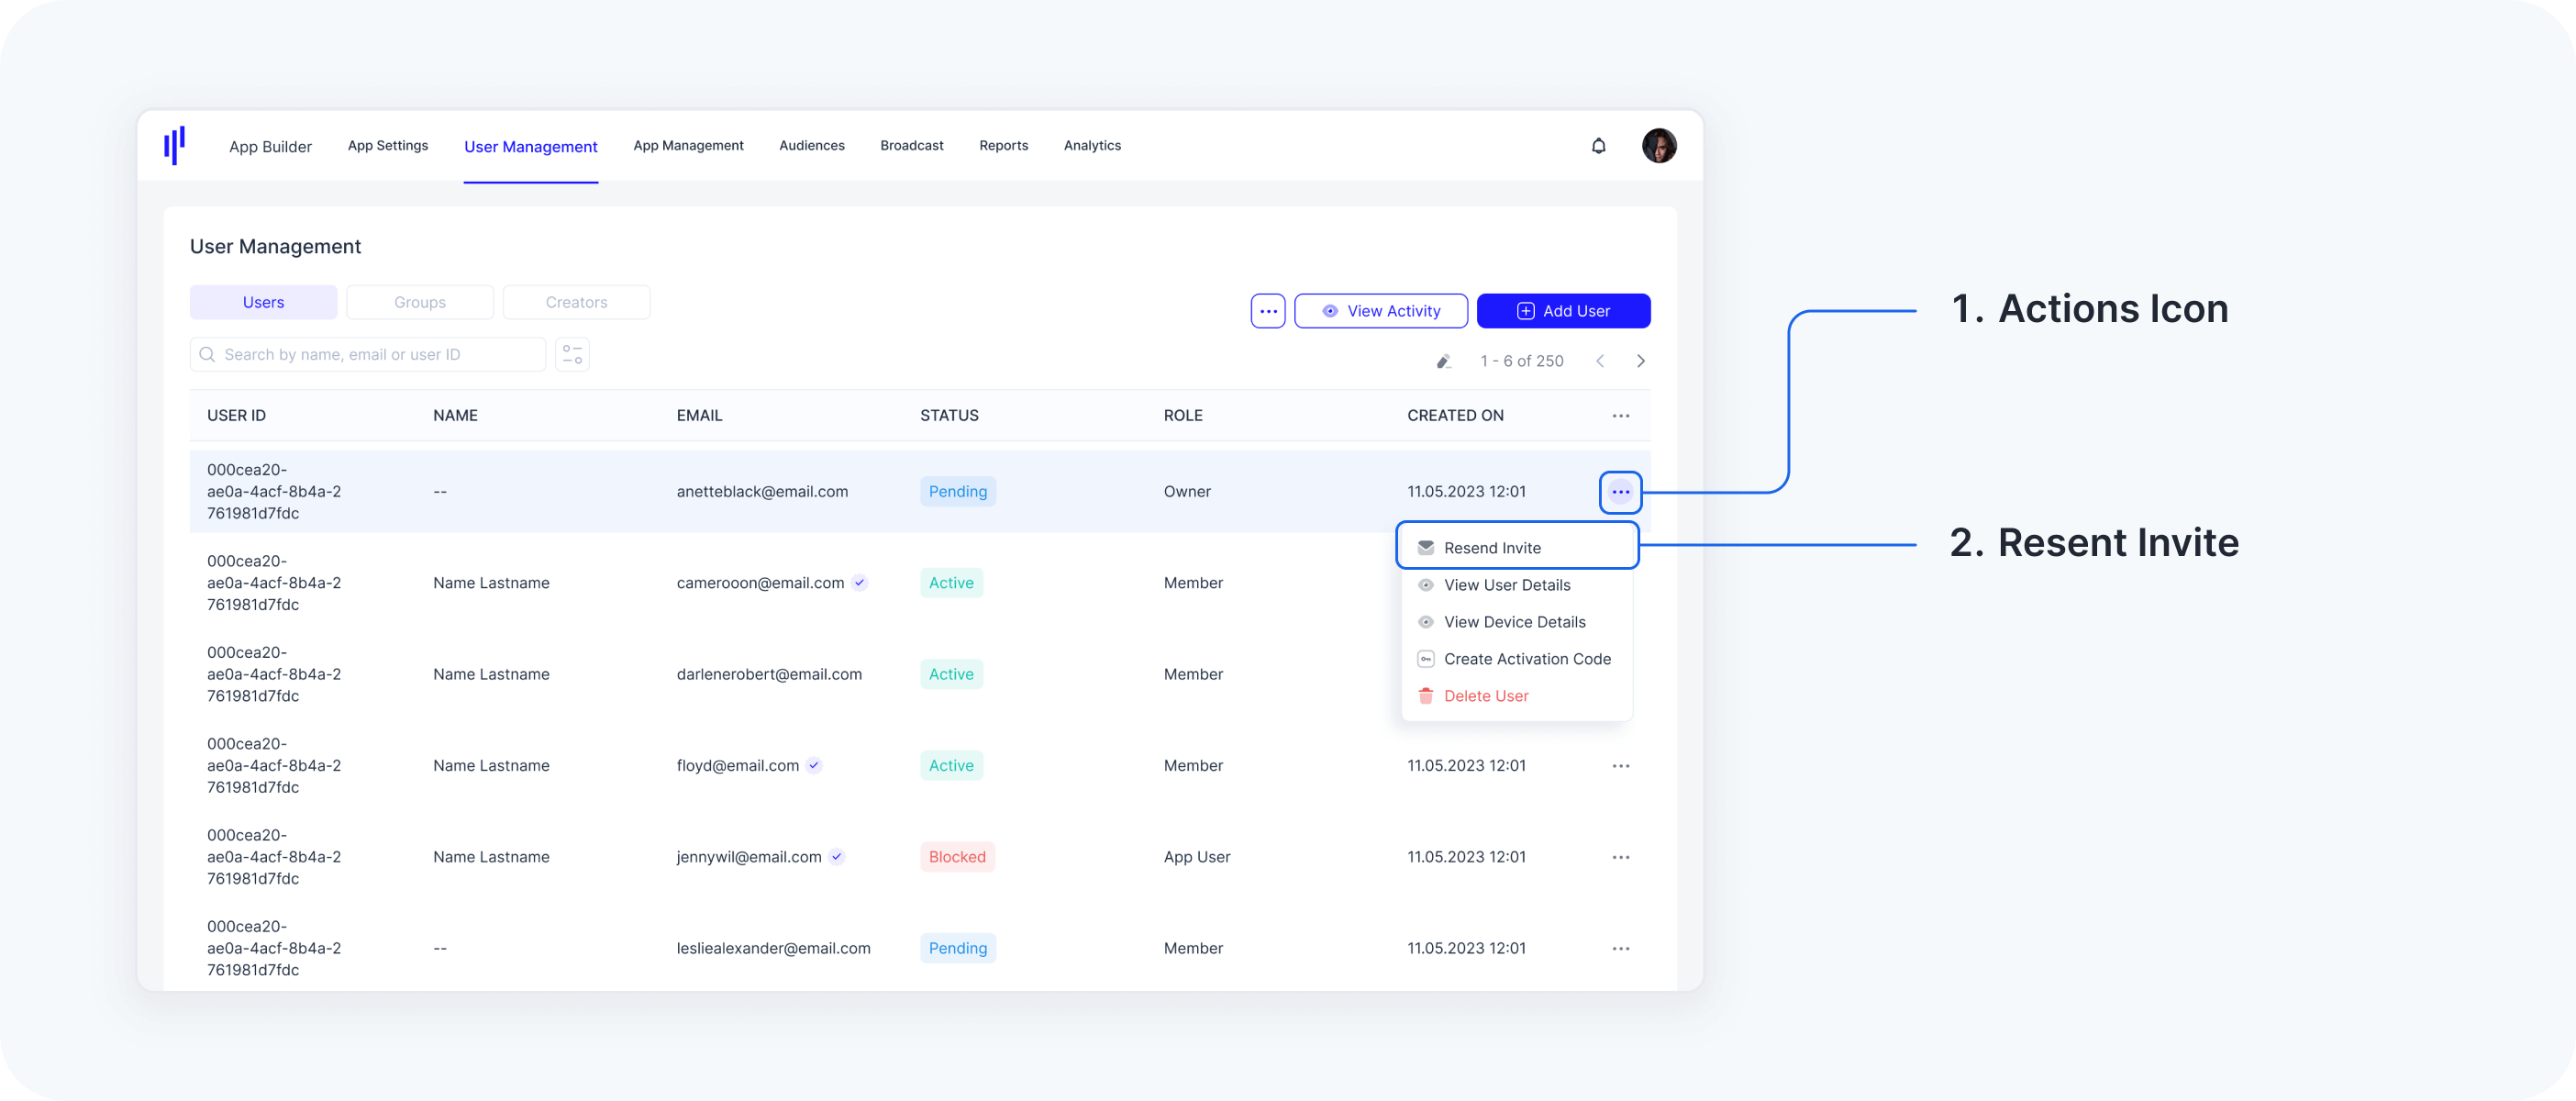
Resend Invitation Email to a Workspace User
A Workspace User (Workspace Owner or Workspace Member) can have their invitation email resent if it was lost or accidentally deleted. You can only resend invitation emails to users who have not yet activated their account, which is indicated by the STATUS column:
- Users with STATUS = 'Pending' can be resent the invitation email.
- Users with STATUS = 'Active' have already activated their account and do not need the invitation resent.
Steps to Resend an Invitation:
- Navigate to User Management.
- Go to the Users tab.
- Search for the specific Workspace User.
- Click on the user to view the Additional Actions..
- Select Resend Invite from the Additional Actions menu.
Workspace Member Roles
Selecting a Role, give access to all of it's Sub-Roles.
e.g.
Giving
'User Management' role, gives all User Management functionalities to Invited
Workspace Member
Giving 'App Management' role, gives access all sub-roles
under 'App Management'
Giving 'Invite User' role, only gives access to
'Invite User' function to the Invited Workspace Member
| Features | Roles | Permissions | Description |
| App Builder | All Access | Workspace Member can design the SuperApp, configure App Settings, and Publish Apps | |
| App Management | App Editor | Allows Workspace Member to create, edit, remove apps, app versions, and force updates | |
| Technical App Editor | Workspace Member can create SDK Config, and View and Regenerate Token | ||
| Broadcast | All Access | Send Push Notifications or Broadcast messages to App Users | |
| Audience | All Access | Configure Audiences to send Broadcast to specific Lists of App Users | |
| Analytics | All Access | Learn about App User behavior through carefully curated Analytics and Data Visualization Tools | |
| Reports | All Access | Have access to reports submitted by the App Users | |
| User Management | Users | Invite User | Workspace Members with this permission can invite new users by sending them invitation emails. They can also resend invitations if the initial invite was not accepted. |
| Modify User State | This permission allows Workspace Members to block or unblock user accounts, providing control over user access. | ||
| View Activity | Workspace Member can access logs of all user activities, helping in tracking actions and ensuring compliance with policies. | ||
| Create Activation Code | Allows the Workspace Member to manually create an Activation Code for App Users | ||
| Delete User Password | To delete App User's Password | ||
| Delete User | Completely delete the user account | ||
| Groups | Restrict Access to User Groups | Selected User Groups are excluded from the Workspace Member Access. The Workspace Member will not be able to view or access the excluded User Group. Multiple Groups can be selected together to exclude from access. | |
| Devices | Device Control | Workspace Member can manage app instances on devices by locking or deleting them, ensuring control over the use and security of the applications on various devices. |
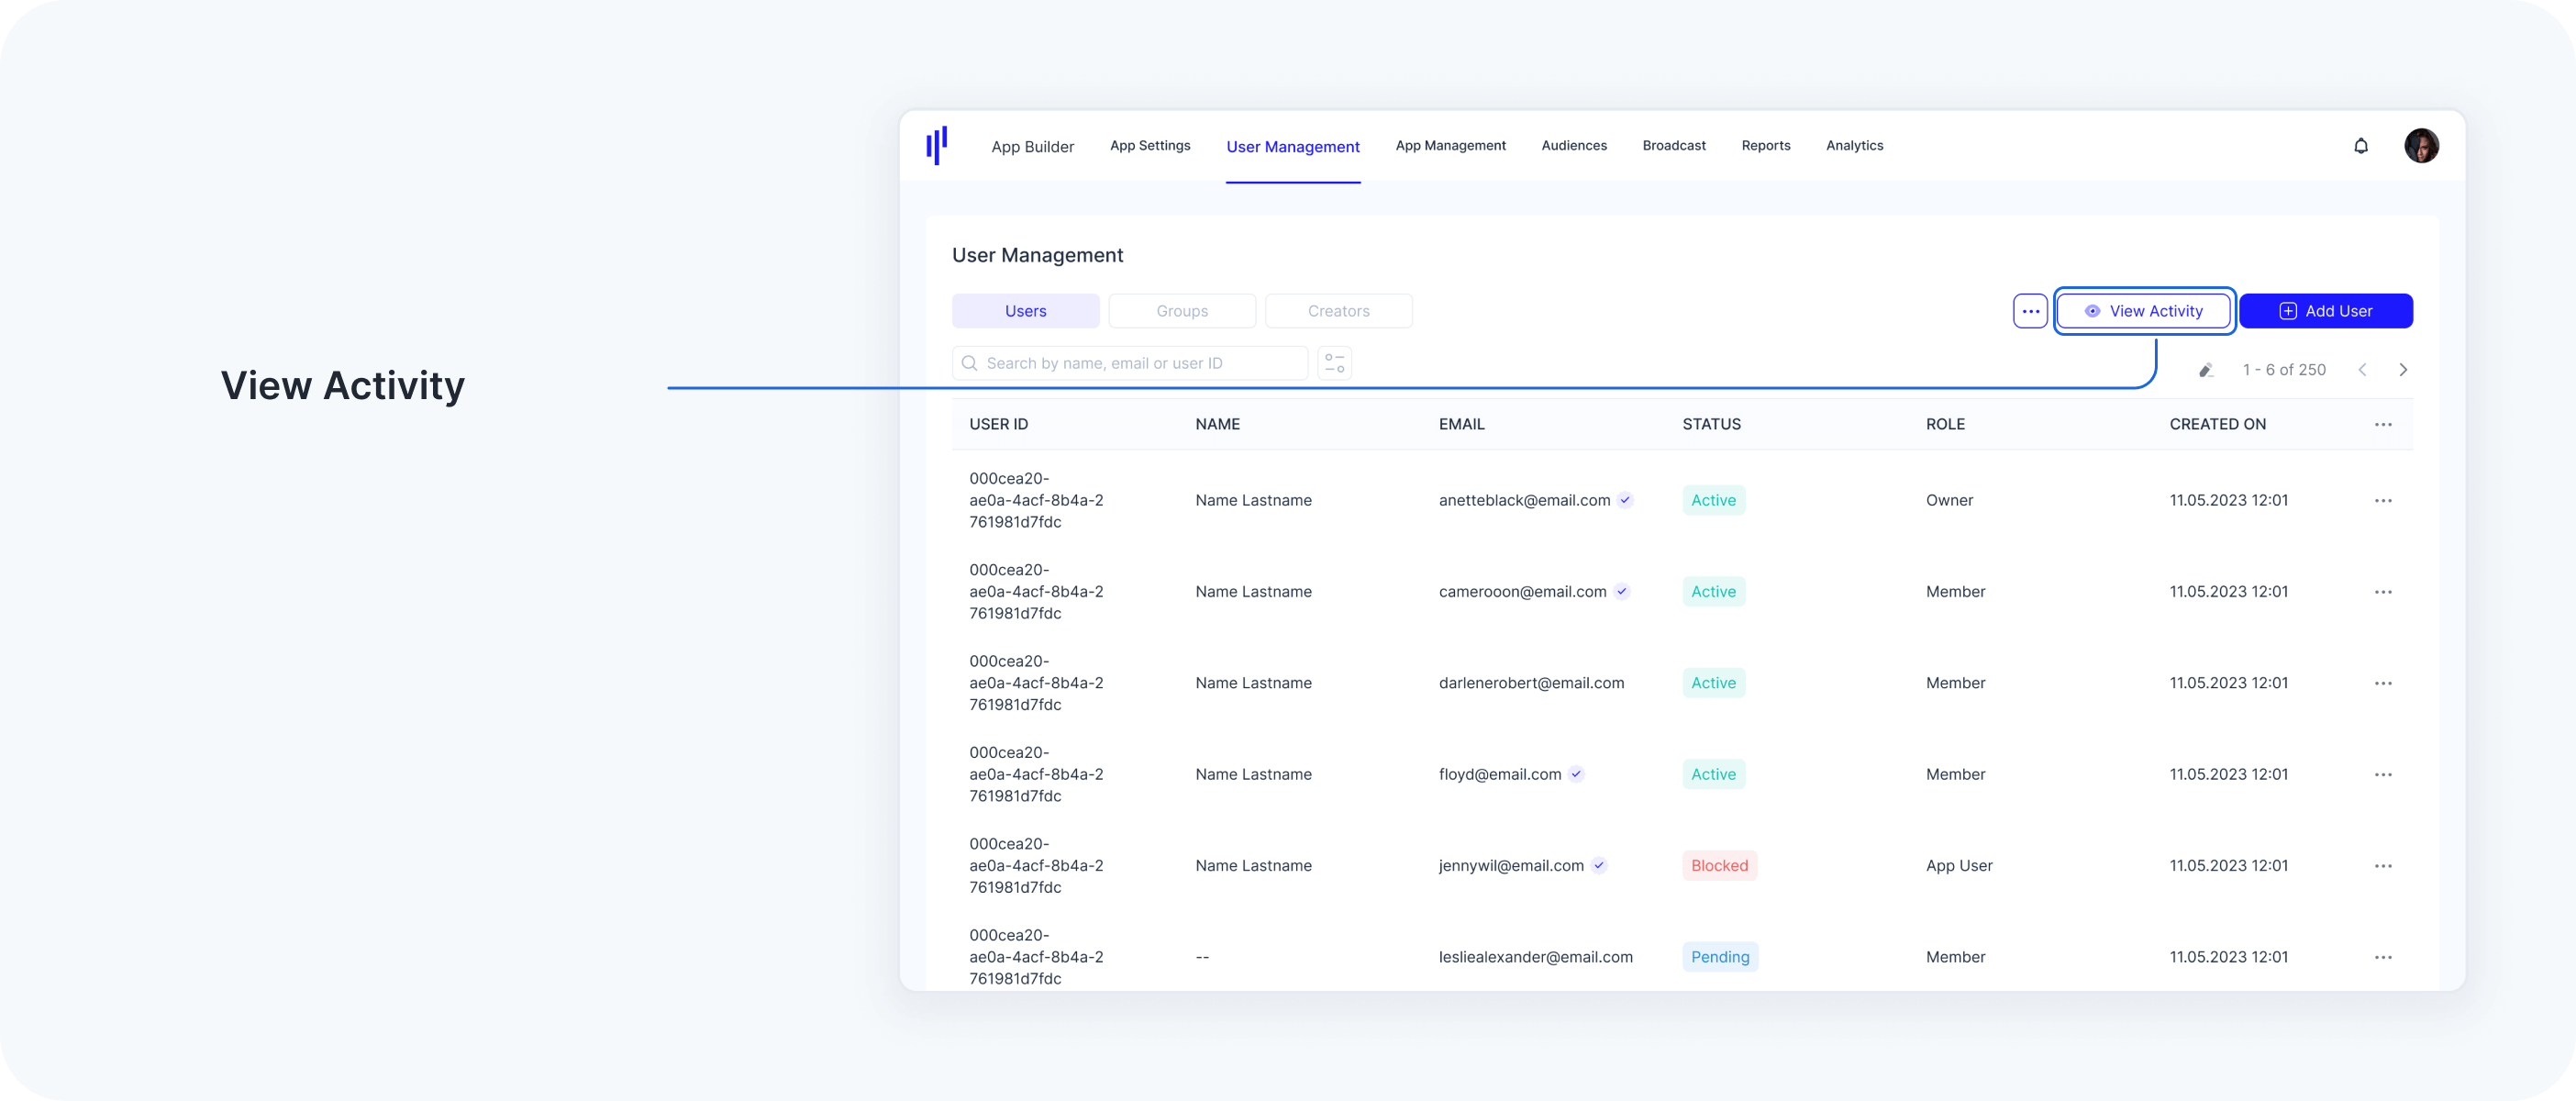
III. Activity
The Activity section is a powerful troubleshooting tool for Workspace Users, where all App User activity is recorded. Each action performed by users is logged here, allowing for detailed tracking and analysis. You can search through the event list, apply filters to display specific data, and export the activity log as a CSV file for further analysis.
Steps to View Activity:
- Navigate to User Management.
- Go to the Users tab.
- Click on View Activity.
Use the Search function and apply Filters to sort and display relevant activity data.