Release your iOS SuperApp
Before you can distribute your SuperApp on the App Store (iOS), ensure you have completed the following essential setup steps:
Mac Device: A macOS-powered device is required for app development, signing, and submission.
- Apple Developer Account An active Apple ID with developer access is necessary to manage app certificates and provisioning profiles. Step-by-Step Instructions
- Apple Developer Program Subscription: Enrollment in Apple’s Developer Program ($99/year) is required for app distribution and access to developer tools.
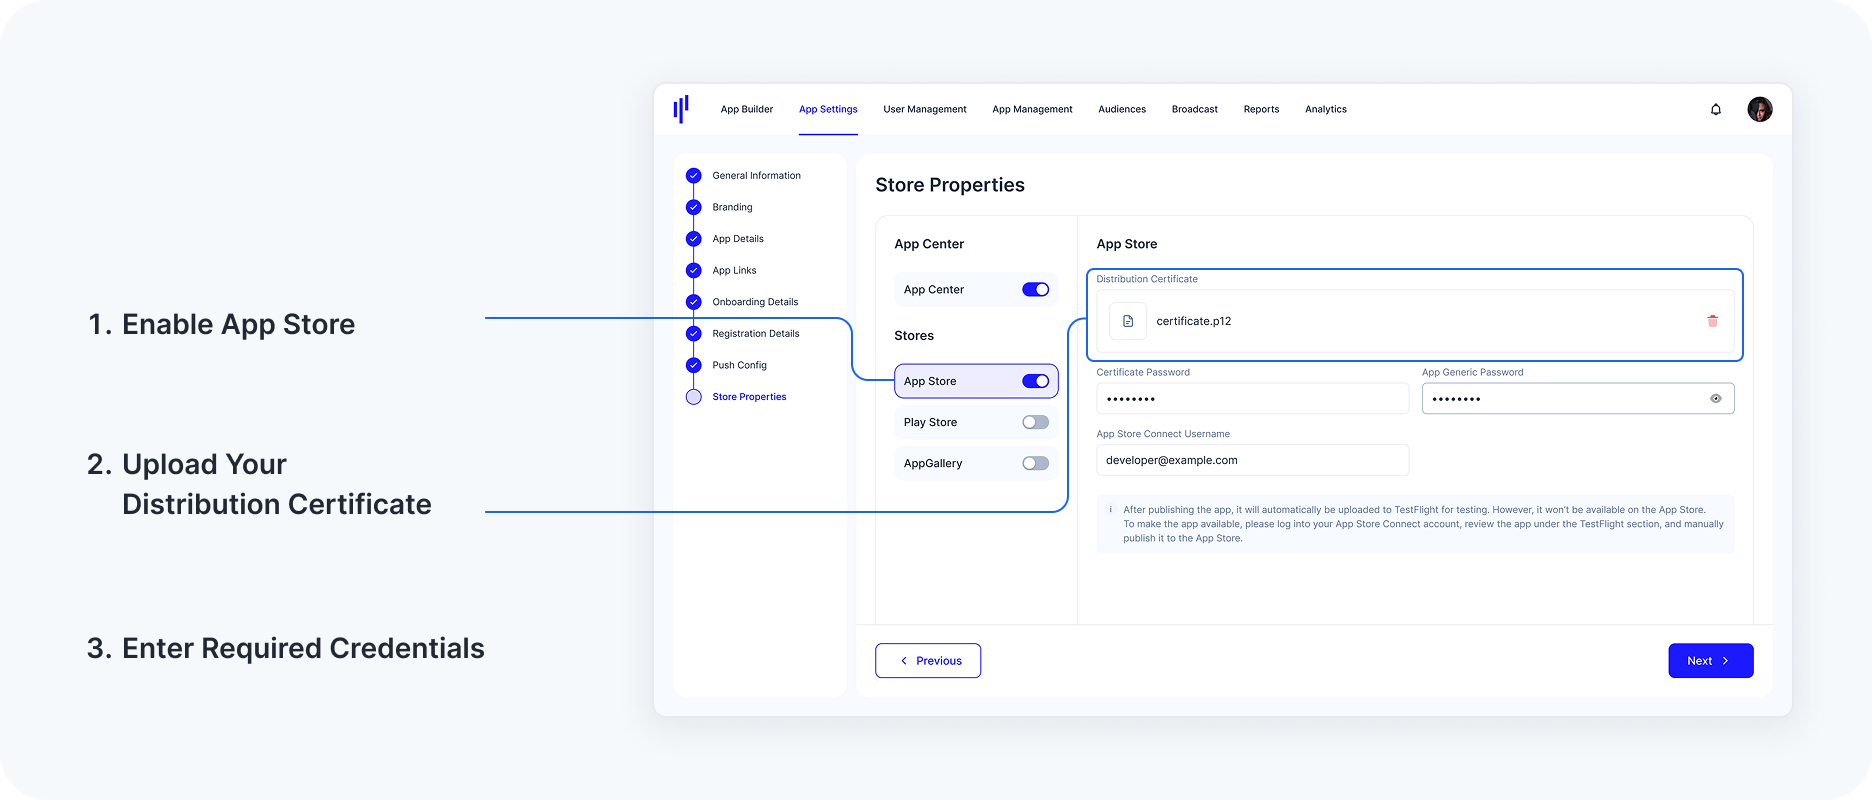
App Store & TestFlight Configuration
Configuring App Store & TestFlight enables you to distribute and test your app before publishing it on the App Store. Follow these steps to set up the configuration.
1. Enable App Store
- Toggle the App Store switch to enable it.
- Once enabled, configuration fields specific to App Store will appear.
2. Upload Your Distribution Certificate
Incase you don't already have one, follow the steps here to create an iOS Distribution Certificate.Click the upload icon in the Distribution Certificate field to select and upload your .p12 file.
If the uploaded certificate is incorrect or needs to be replaced, click the trash icon next to the file to remove it, and upload a new certificate.
3. Enter Required Credentials
Fill in the following fields:Certificate Password: Enter the password associated with your .p12 file.
App Store Connect Username: Provide your App Store Connect account email address.
When providing your App Store Connect Username/email, ensure that the account possesses at least the App Manager role. This role grants the necessary permissions to create apps and upload builds.
- App Generic Password: Enter the generic password for your App Store Connect account. This password is generated in your Apple Developer account under App-Specific Passwords. Refer to Apple Documentation.
Team ID: A Team ID is a unique 10-character string generated by Apple that's assigned to your team. You can find this in your Apple Developer Account under Membership details.
4. Save Your Configuration
- Review all entered details carefully.
- Click Save/Next to finalize the App Store configuration.
5. Uploading to TestFlight
Once configured, the KOBIL Portal will automatically upload the app to TestFlight for testing.
- Note: The app will not be immediately available on the App Store.
6. Publishing the App to the App Store
- Log in to your App Store Connect account.
- Review the app under the TestFlight section.
- Manually publish the app to the App Store from there.
Create Your Apple Developer Account
Additional Notes: You will need access to an iOS device and an Apple ID.
Configuring App Center allows you to manage testing and distribution before releasing your app to production. Follow these steps to enable and set up App Center.
Step 1: Sign in to Your Apple ID
- Visit Apple ID Sign-In.
- Log in with your Apple ID credentials.
Step 2: Begin the Enrollment Process
- Go to the Apple Developer Program Enrollment page.
- Scroll down and agree to the terms and conditions.
- Proceed to the next step where you will choose your account type.
Step 3: Choose Individual or Organization Enrollment
Individual: Choose this option if you are publishing the app under your personal name.
Company/Organization: Choose this option if your app is for a business. This allows multiple users to manage the account and ensures your company name appears on the App Store instead of your personal details.
Step 4: Submit Your Enrollment Application
- Once all required details are provided:
- Review your application.
Click Submit to send your request to Apple.
Processing Time:
- Apple typically reviews and processes applications within a few days.
You now have an Apple Developer Account and will be ready to publish your SuperApp on the Apple Store soon.
Enrolling as an Organization
Notes: Choosing Organization has DUNS Number Requirement for Business Verification
To establish your company’s credibility and ensure compliance with Apple’s verification process, a D-U-N-S® Number (Data Universal Numbering System) is mandatory for enrolling as an organization in the Apple Developer Program. This globally recognized identifier enhances your business’s legitimacy and streamlines approval processes.
- Check Your Company’s D-U-N-S® Number: Validate your existing business registration in Apple’s system by searching here.
- Request a D-U-N-S® Number: If your organization is not listed,
initiate the registration process here.
Ensure your company is a legally incorporated entity before applying.
Processing Timeline: The verification and issuance of a D-U-N-S® Number typically take up to 14 business days. To avoid delays, ensure all business details match official records.
Once a D-U-N-S® Number is assigned, you can enter your details and continue with Publishing you SuperApp
iOS Distribution Certificate (.p12)
Step 1: Generate a Certificate Signing Request (CSR)
Open Keychain Access on your Mac.
In the top menu, go to
Keychain Access > Certificate Assistant > Request a Certificate from a Certificate Authority.
In the pop-up window, fill in the required details:
User Email Address: Enter your Apple Developer Account email.
Common Name: Enter a name for this certificate (e.g., "yourSuperApp iOS").
CA Email Address: Leave this field blank.
Request is For: Select "Saved to disk", then click Continue.
Save the .CSR file to your local machine.
Step 2: Create an iOS Distribution Certificate in Apple Developer Portal
- Go to Apple Developer Account.
Navigate to Certificates, Identifiers & Profiles.
Under the Certificates section, click the "+" button to create a new certificate.
Select "Apple Distribution" and click Continue.
Upload the .CSR file generated in Step 1 and click Continue.
Download the generated .cer file and double-click it to install it in Keychain Access.
Step 3: Export the P12 File from Keychain Access
Open Keychain Access on your Mac..
In the "Certificates" section, locate the installed Apple Distribution Certificate.
Expand the certificate to reveal the associated private key.
Right-click the private key and select "Export".
Choose Personal Information Exchange (.p12) as the format.
Set a secure password and click Save.
The .p12 file is now exported and ready to be uploaded on the KOBIL Portal.
App Store Connect Setup
The first iOS build will always fail because the app details are missing in App Store Connect. This is a normal step in the publishing process.
After completing the steps below, the app details will be properly set up, and the second attempt will successfully upload the app to TestFlight for testing.
When publishing your iOS SuperApp for the first time, you will encounter an issue where the initial build fails. This happens because the necessary app details have not been created in App Store Connect. Please follow the steps below to successfully publish the SuperApp to Testflight.
Step-by-Step Guide
After the first iOS build fails.
Log into App Store Connect
Create a New App
After logging in, tap the "+" icon and then tap "New App" to create a new app entry.
Fill in App Details
Select "Platform" as "iOS".
Enter the App Name.
Choose the Primary Language for your app.
Select Bundle ID
Tap on "Bundle ID" and choose the correct app name from the dropdown list
Look for a the following Bundle ID
'XC com kobil superapp araboxcloud {yourTenantName} - com.kobil.superapp.araboxcloud.{yourTenantName }'
If the app has not been published before, the corresponding Bundle ID will not appear in the dropdown list. You need to go back and Publish the iOS app from KOBIL PORTAL first.
- SKU
This should match the Bundle ID e.g.
'com.kobil.superapp.araboxcloud.{yourTenantName}'
Choose Access Level
Select "Full Access" to ensure that all necessary permissions are granted.
Tap "Create"
Reattempt Publishing the App
Once the app is created in App Store Connect, go back to the Portal and tap the "Publish App" button again to proceed with the second run and successfully build and publish your iOS SuperApp to TestFlight.
TestFlight Setup
The app must be successfully uploaded to TestFlight before you can add testers.
Testers added to the group will receive an invitation to install the app for testing purposes.
Ensure you have the proper tester email addresses and permissions set up to allow seamless access to the app on TestFlight.
Step-by-Step Guide
Go to "App Store Connect"
Open App Store Connect and navigate to the TestFlight section.
Create a New Test Group
Tap the "+" icon next to INTERNAL TESTING.
Tap "Create"
- Wait for Build to be Available on TestFlight
Add Testers to the Created Group
Once the build is available, add your testers to the newly created test group by selecting them from your contacts or entering their details.
Publish the App
After the testers have been added, you can now publish the app for internal testing on TestFlight.