Services
In the KOBIL SuperApp platform, Services are the functional backbone of your screen components. They define what happens when users interact with your SuperApp — whether it’s launching a chatbot, opening another app, or loading a mini application.
Currently, the App Builder supports three service types:
Service Types
MiniApp
A MiniApp Service allows you to embed powerful, interactive applications inside your SuperApp — without requiring users to download a separate app.
Key advantages:
- Built using familiar web technologies
- Backend connected via APIs
- Cross-platform (iOS + Android with one codebase)
Supports built-in SuperApp APIs like:
- user data access, authentication, payments, digital signing, chat
MiniApps are ideal for building anything from a store locator to a full-featured shopping or booking experience. They're lightweight, secure, and fast to deploy.
App2App
App2App Services allow you to seamlessly link your SuperApp with other native mobile applications installed on the user’s device — such as banking apps, maps, or messaging tools.
With App2App, you can:
- Launch external apps via a URI (deeplink)
- Optionally pass user information to maintain context or pre-fill data
All you need is the destination app’s deeplink schema.
App2App allows users to switch to external apps when necessary, while keeping context. It’s best used when certain features can’t be supported inside the SuperApp.
Chat
Chat Services enable you to integrate smart, rule-based chatbots or guided flows within the SuperApp. These bots are designed to handle interactions, collect feedback, and perform simple tasks through structured conversations.
How it works:
- The chat is triggered from a screen component
The backend receives and processes incoming messages through a webhook
Logic is typically rule-based, responding to message types (like init) or text choices
Chat Services are ideal for lightweight customer support, surveys, onboarding flows, or collecting user feedback — all within the SuperApp.
Service Tab – UI Overview
The Services tab in the Library allows you to view, create, filter, and manage all services used throughout your screens.
- Services Tab – Empty State
When no services have been added yet, users see an empty state with a button labeled "Add Service to Library." This is the starting point for creating MiniApp, App2App, or Chat services.
- Services Tab – Filled State
Once services are added, they appear as cards, each showing:
- Service Icon
- Service Name
- Service Type (MiniApp / App2App / Chat)
- Users can:
- Search by name using the top search bar
Filter services by type and category using the filter dropdown
- Services Tab – Full-Screen Table View
Click the expand icon in the top right corner to switch to a detailed table view. This layout is ideal for bulk reviews or when working with a large number of services.
Creating a New Service
To connect content to your SuperApp screen, you need to first create a Service in the Library. Services can be MiniApp, App2App, or Chat. The creation form adapts based on the selected type.
Step 1 – Open the Library Panel
Click Library from the left toolbar.
Make sure the Services tab is selected.
Click Add Service to Library / Add Service (Extended View)
Step 2 – Select the App Type
Choose the service type from the dropdown (MiniApp is selected by default):
MiniApp – Launches a service inside the SuperApp.
App2App – Opens an external native app using a deep link.
Chat – Adds a chatbot integration.
Step 3 – Fill Out the Basic Information
Fields will vary by type:
| MiniApp | App2App | Chat |
|---|---|---|
|
|
|
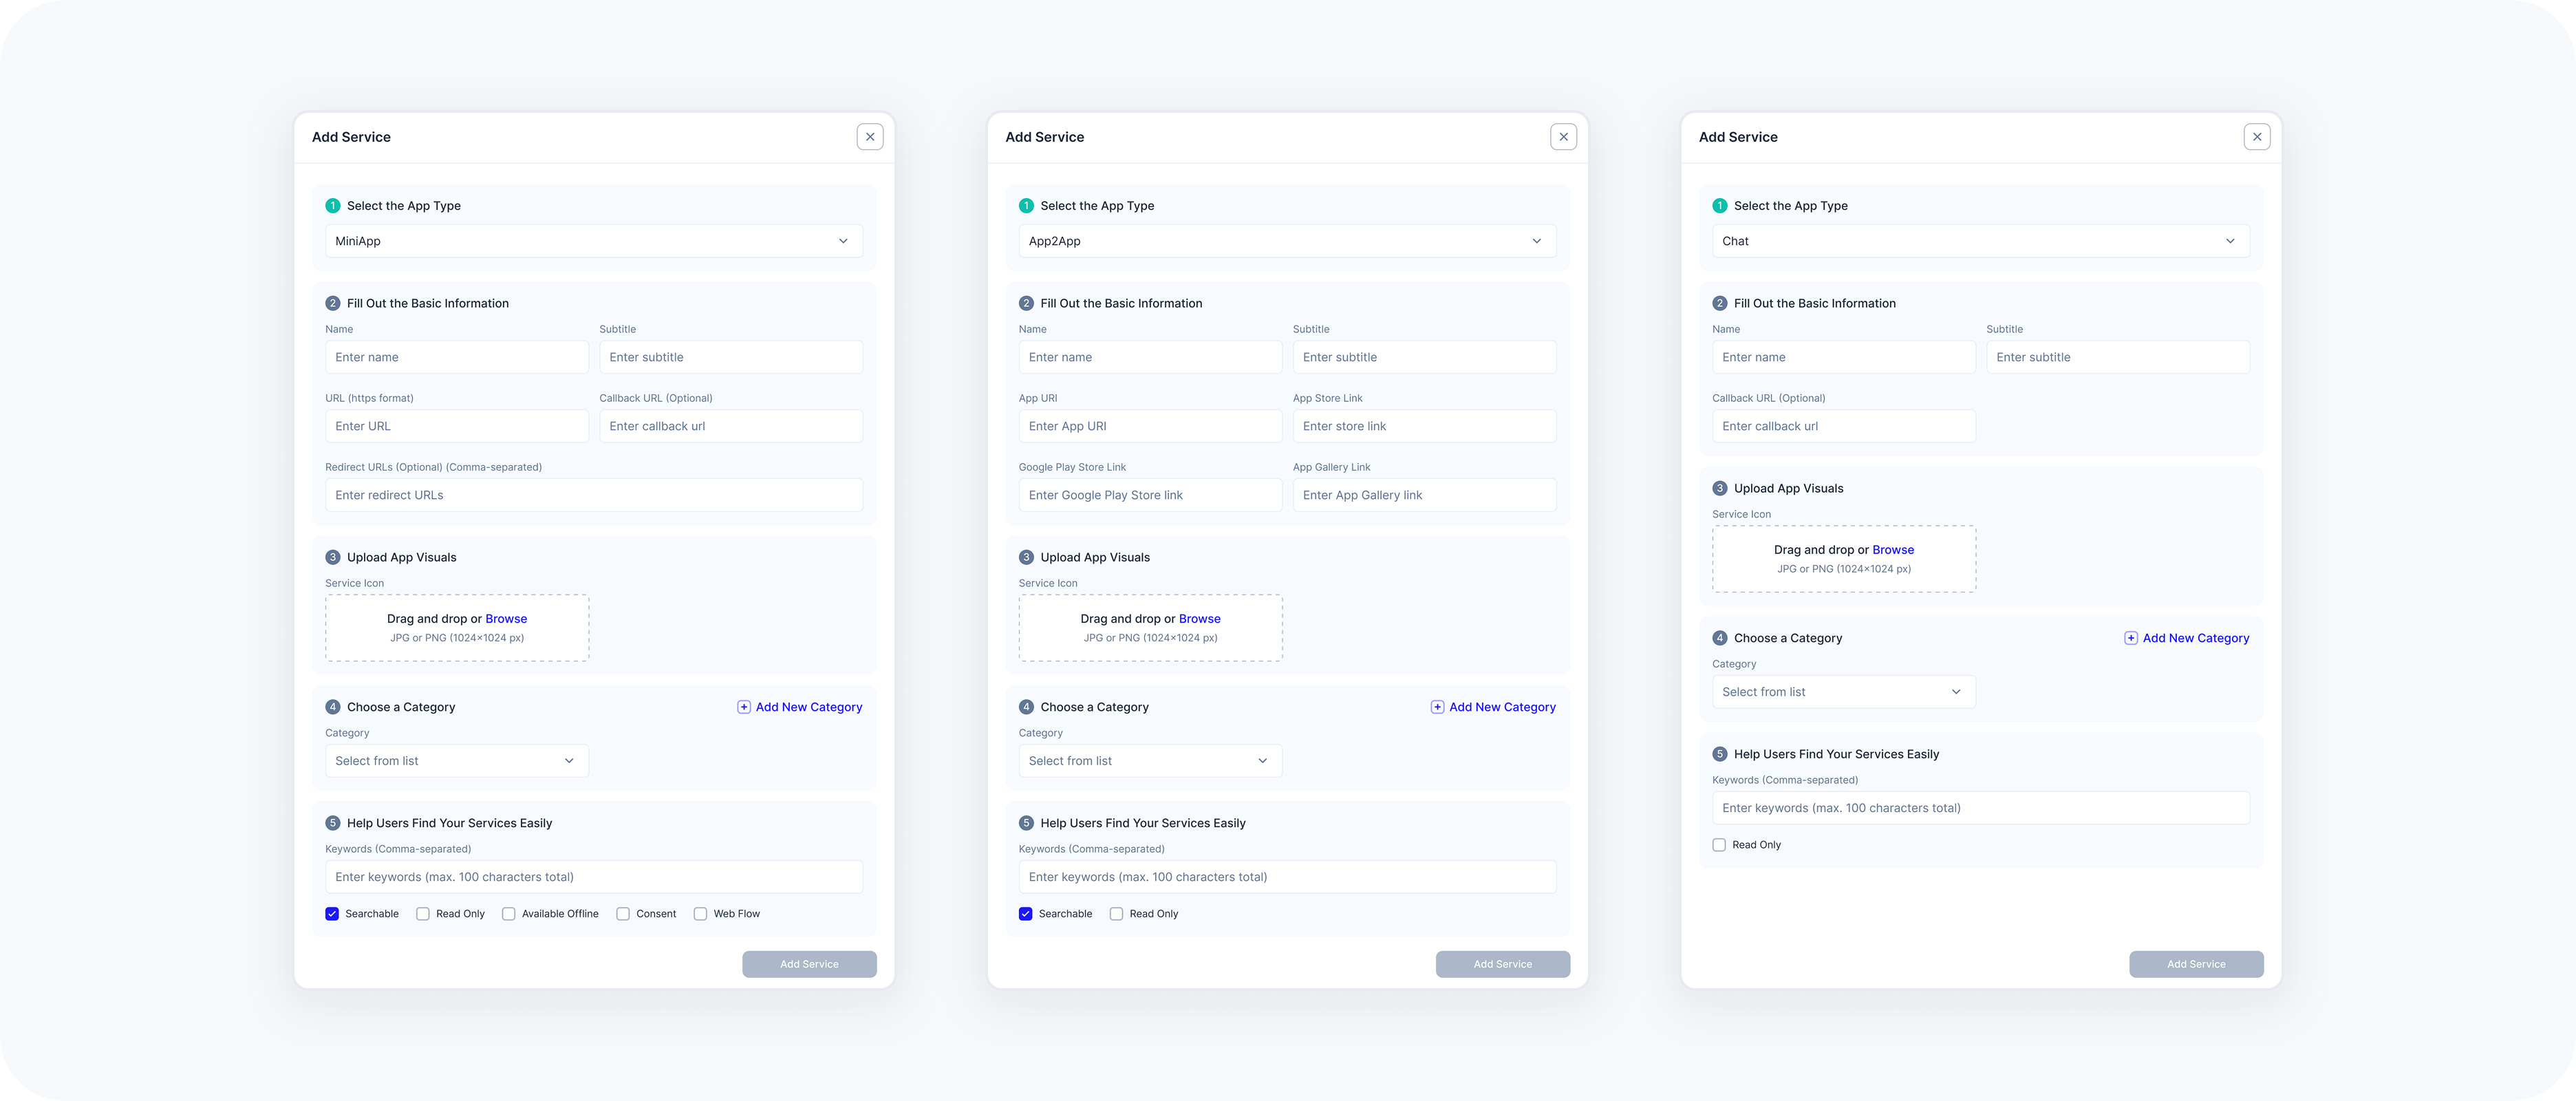
Step 4 – Upload App Visuals
Upload a Service Icon (.JPG or .PNG, 1024×1024 px) KOBIL Docs – Service Icons
Optional: Drag and drop or click Browse
Step 5 – Categorize the Service
- Select a category from the list
Or create one by clicking Add New Category
Step 6 – Help Users Find the Service
- Add Keywords (comma-separated)
Toggle any of the following flags:
Searchable – Include this service in the SuperApp’s search results.
Consent Required – Display only if the user has provided necessary consent.
Web Flow – Checking Webflow changes the authenticator from the preset one to "Browser". Ask our Team to learn more about your workspace specific authentication methods.
Step 7 – Finalize
Click Add Service to complete.
- A success or error toast will appear at the bottom of the screen.
Once created, services are not shown in the app until they are added to a component and placed on a screen.
Editing Existing Services
Once a service is added to your Library, you can update its details at any time. This is useful for correcting URLs, updating icons, or adjusting metadata such as category or searchability.
Step 1 – Navigate to the Library Panel
Go to Library → make sure you’re in the Services tab.
Step 2 – Open the Action Menu
Locate the service you want to edit. Click the 3-dot menu on the right.
Step 3 – Click "Edit"
This opens the same modal used when creating the service, pre-filled with its existing data.
Step 4 – Make Your Changes
- Update any fields like Name, URL, or Icon
Change the App Type only if necessary (not recommended for services in production)
- Modify metadata (e.g. keywords, flags, category)
Step 5 – Save Changes
Click Save to apply updates.
• Editing a service affects all screens using that service.
• Deleting a service removes it entirely — use edit if unsure.
Deleting a Service
If a service is no longer needed, you can remove it from the workspace by deleting it from the Library. This action is permanent and will impact all screens where this service is used.
Step 1 – Navigate to the Library Panel
Go to Library → switch to the Services tab.
Step 2 – Open the Action Menu
Locate the service you want to remove. Click the 3-dot menu on the right.
Step 3 – Select "Delete"
- Click the Delete option from the dropdown menu.
Step 4 – Confirm Deletion
A confirmation dialog will appear: “Deleting this service will permanently remove it from the workspace. This action cannot be undone. Please confirm that you are sure about this decision, as it will affect everyone in the workspace.”
Step 5 – Click “Delete” to Confirm
Once confirmed, the service will be removed from the Library and any screens using it.
• This action cannot be undone.
• If the service is currently being used in any screen, those components
will no longer display content.
• Use caution when deleting reused services.